CodeFlicker Introduction
CodeFlicker is an AI-powered code editor that understands your codebase through natural language, helping you achieve code understanding, code generation, bug fixing, and requirement implementation. It helps developers improve coding efficiency and deliver code more effectively.
Join Waitlist
CodeFlicker is coming soon. Visit the waitlist page to join and get early access.
Core Features
Jam (Intelligent Chat)
Autonomous AI coding assistant designed for complex development tasks, featuring autonomous decision-making, environmental awareness, and tool usage capabilities.
Duet Mode
Human-AI deep collaboration development mode designed for complex tasks, emphasizing early consensus building and systematic technical design.
Code Completion
Intelligent assistance designed to accelerate coding, providing line-level or function-level code suggestions.
MCP Protocol
Standardized protocol designed for AI tool integration, allowing LLMs to access custom tools and services.
Learn More
Extension Management
Extension management features in CodeFlicker
Changelog
Check our latest updates
Feedback
Provide us your feedback
Agent Modes
Agent chat is divided into multiple modes based on different usage scenarios, each with independent optimization and different available features. You can switch modes via the dropdown near the input box or using the shortcut key (⌘.).
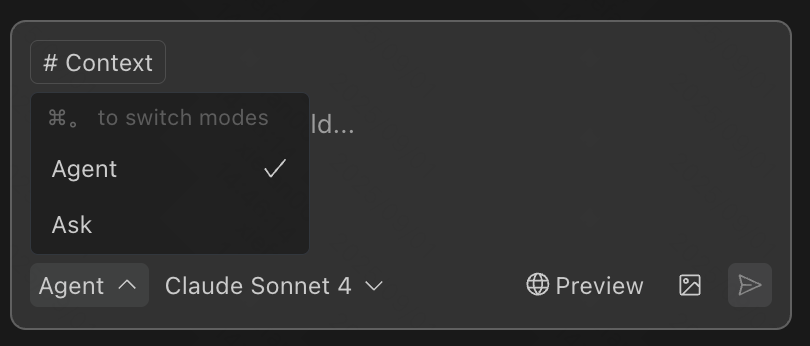
Agent Mode
This is the default mode, recommended for complex task scenarios. AI can perform complex logical understanding and implement specific code logic.
Ask Mode
Ask mode is a read-only mode that answers user questions by searching the codebase, but does not perform any write operations. Additionally, Ask mode has faster overall response times, making it more suitable for lightweight scenarios like Q&A or understanding.
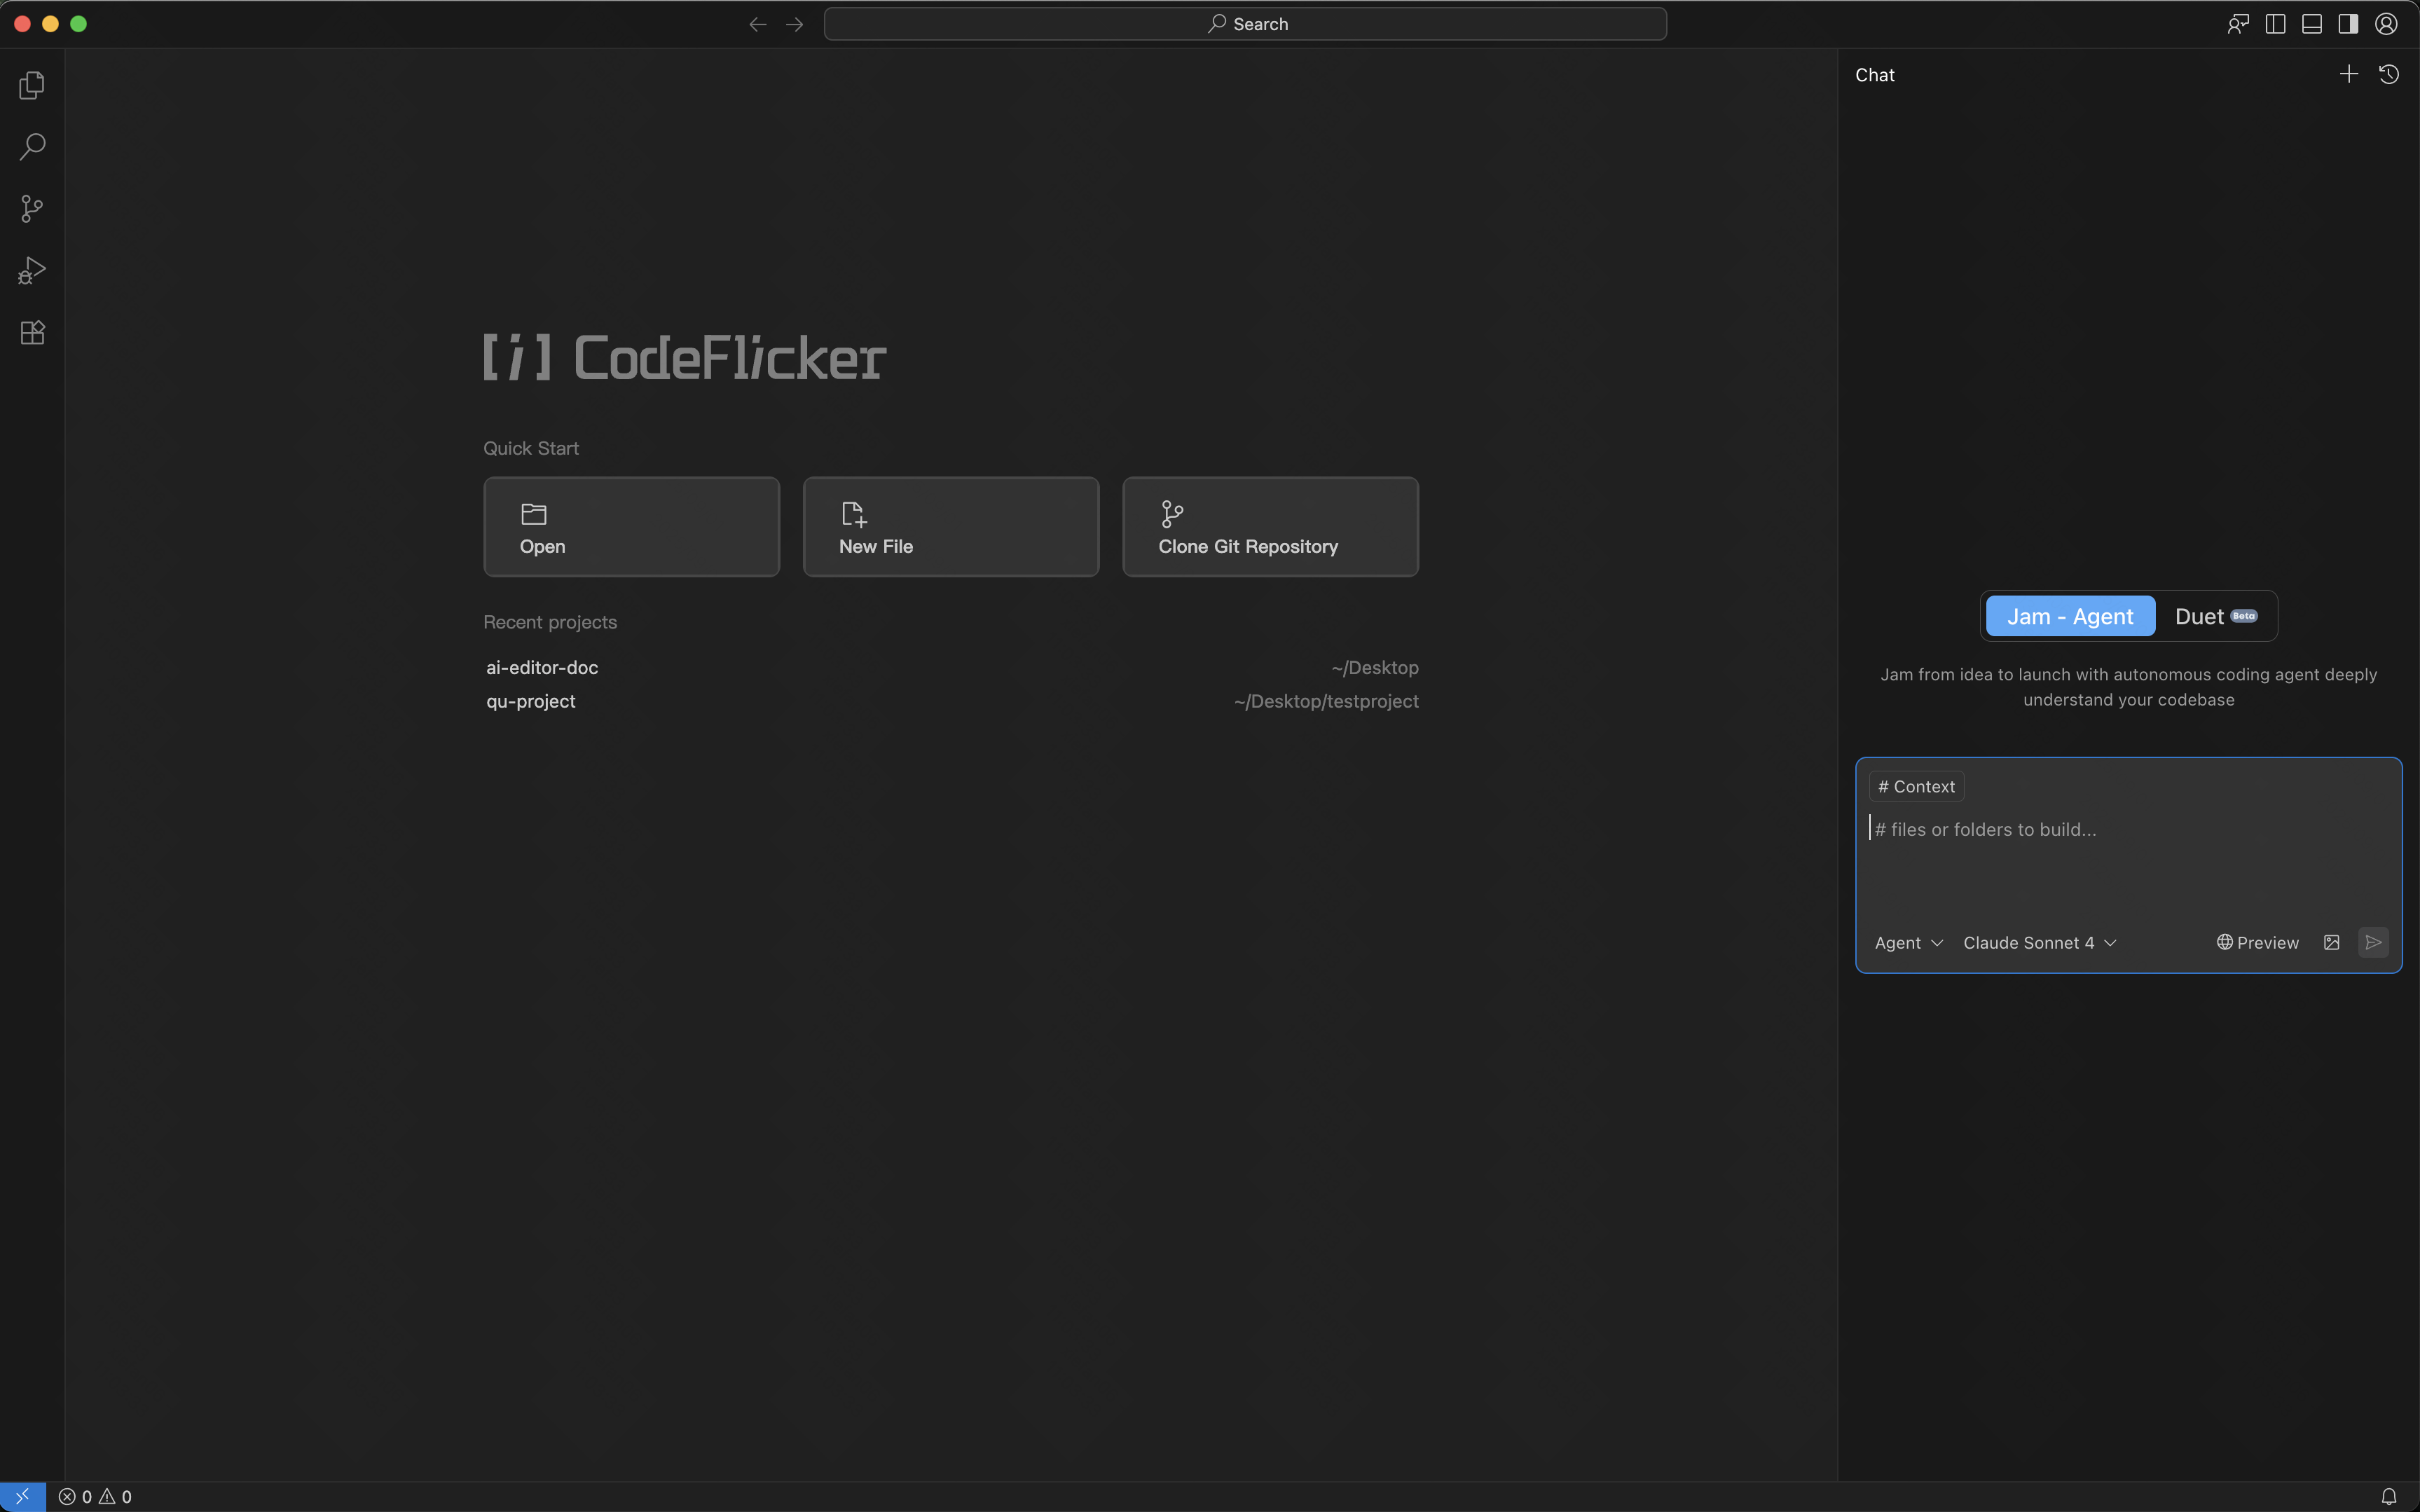
Intelligent Chat (Jam)
Autonomous coding agent from idea to release, with deep understanding of your codebase. The agent features autonomous decision-making, environmental awareness, and tool usage capabilities. It can complete coding tasks end-to-end using tools like engineering search, file editing, and terminal based on developer coding needs.
Autonomous Decision-Making
- • Code search
- • Regular expression search
- • File reading
- • Directory reading
- • File editing
- • Command execution
Intelligent Workflow
- • Autonomous execution without user confirmation
- • Autonomous decision-making based on tool results
- • Flexible handling of various development scenarios
- • Provides detailed tool execution results
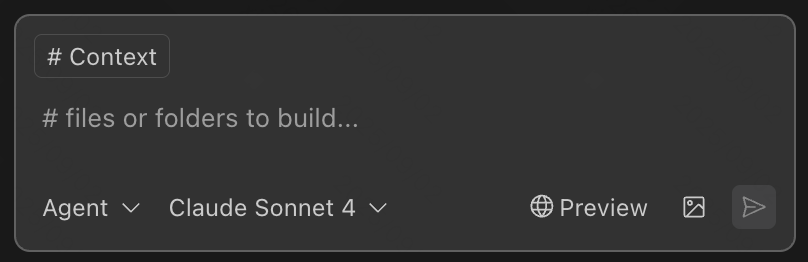
Efficient Content Referencing
Automatic Content Filling
By default, currently open files are automatically filled as content.
One-Click Add Selected Code
Supports using shortcut key ⌘L to add selected code blocks, or quickly add selected areas to the agent via right-click menu.
Copy-Paste Smart Recognition
When copying and pasting multi-line code into the input box, it automatically recognizes and displays in "file + line number" format in the context area.
Changed Files Workspace
- • Line-by-line code changes display
- • Full control over multi-file code modifications
- • Batch accept or reject changes
- • Handle single file changes independently
Restore Checkpoint
- • One-click rollback to specific conversation version
- • Ensures every modification is controllable and traceable
- • Hover to display "Rollback" button
- • Automatically restores code state after confirmation
Automatic Lint Error Fixing (Beta)
After the agent completes code generation, it supports automatic checking of incremental lint errors in modified files and provides one-click fix capability.
You can enable or disable lint self-checking and fixing in Settings > Enable Automatic Lint Issue Detection.
Code Completion
During coding, engineers can receive line-level or function-level suggestions from CodeFlicker in the editor.
Smart Completion Features
- • Automatically generates code completion suggestions when pressing Enter, Space, or other keys
- • Use Tab key to accept suggestions, Esc key to reject, or continue programming
- • By default, no suggestions at end of line
- • Intelligent prediction based on context and code patterns
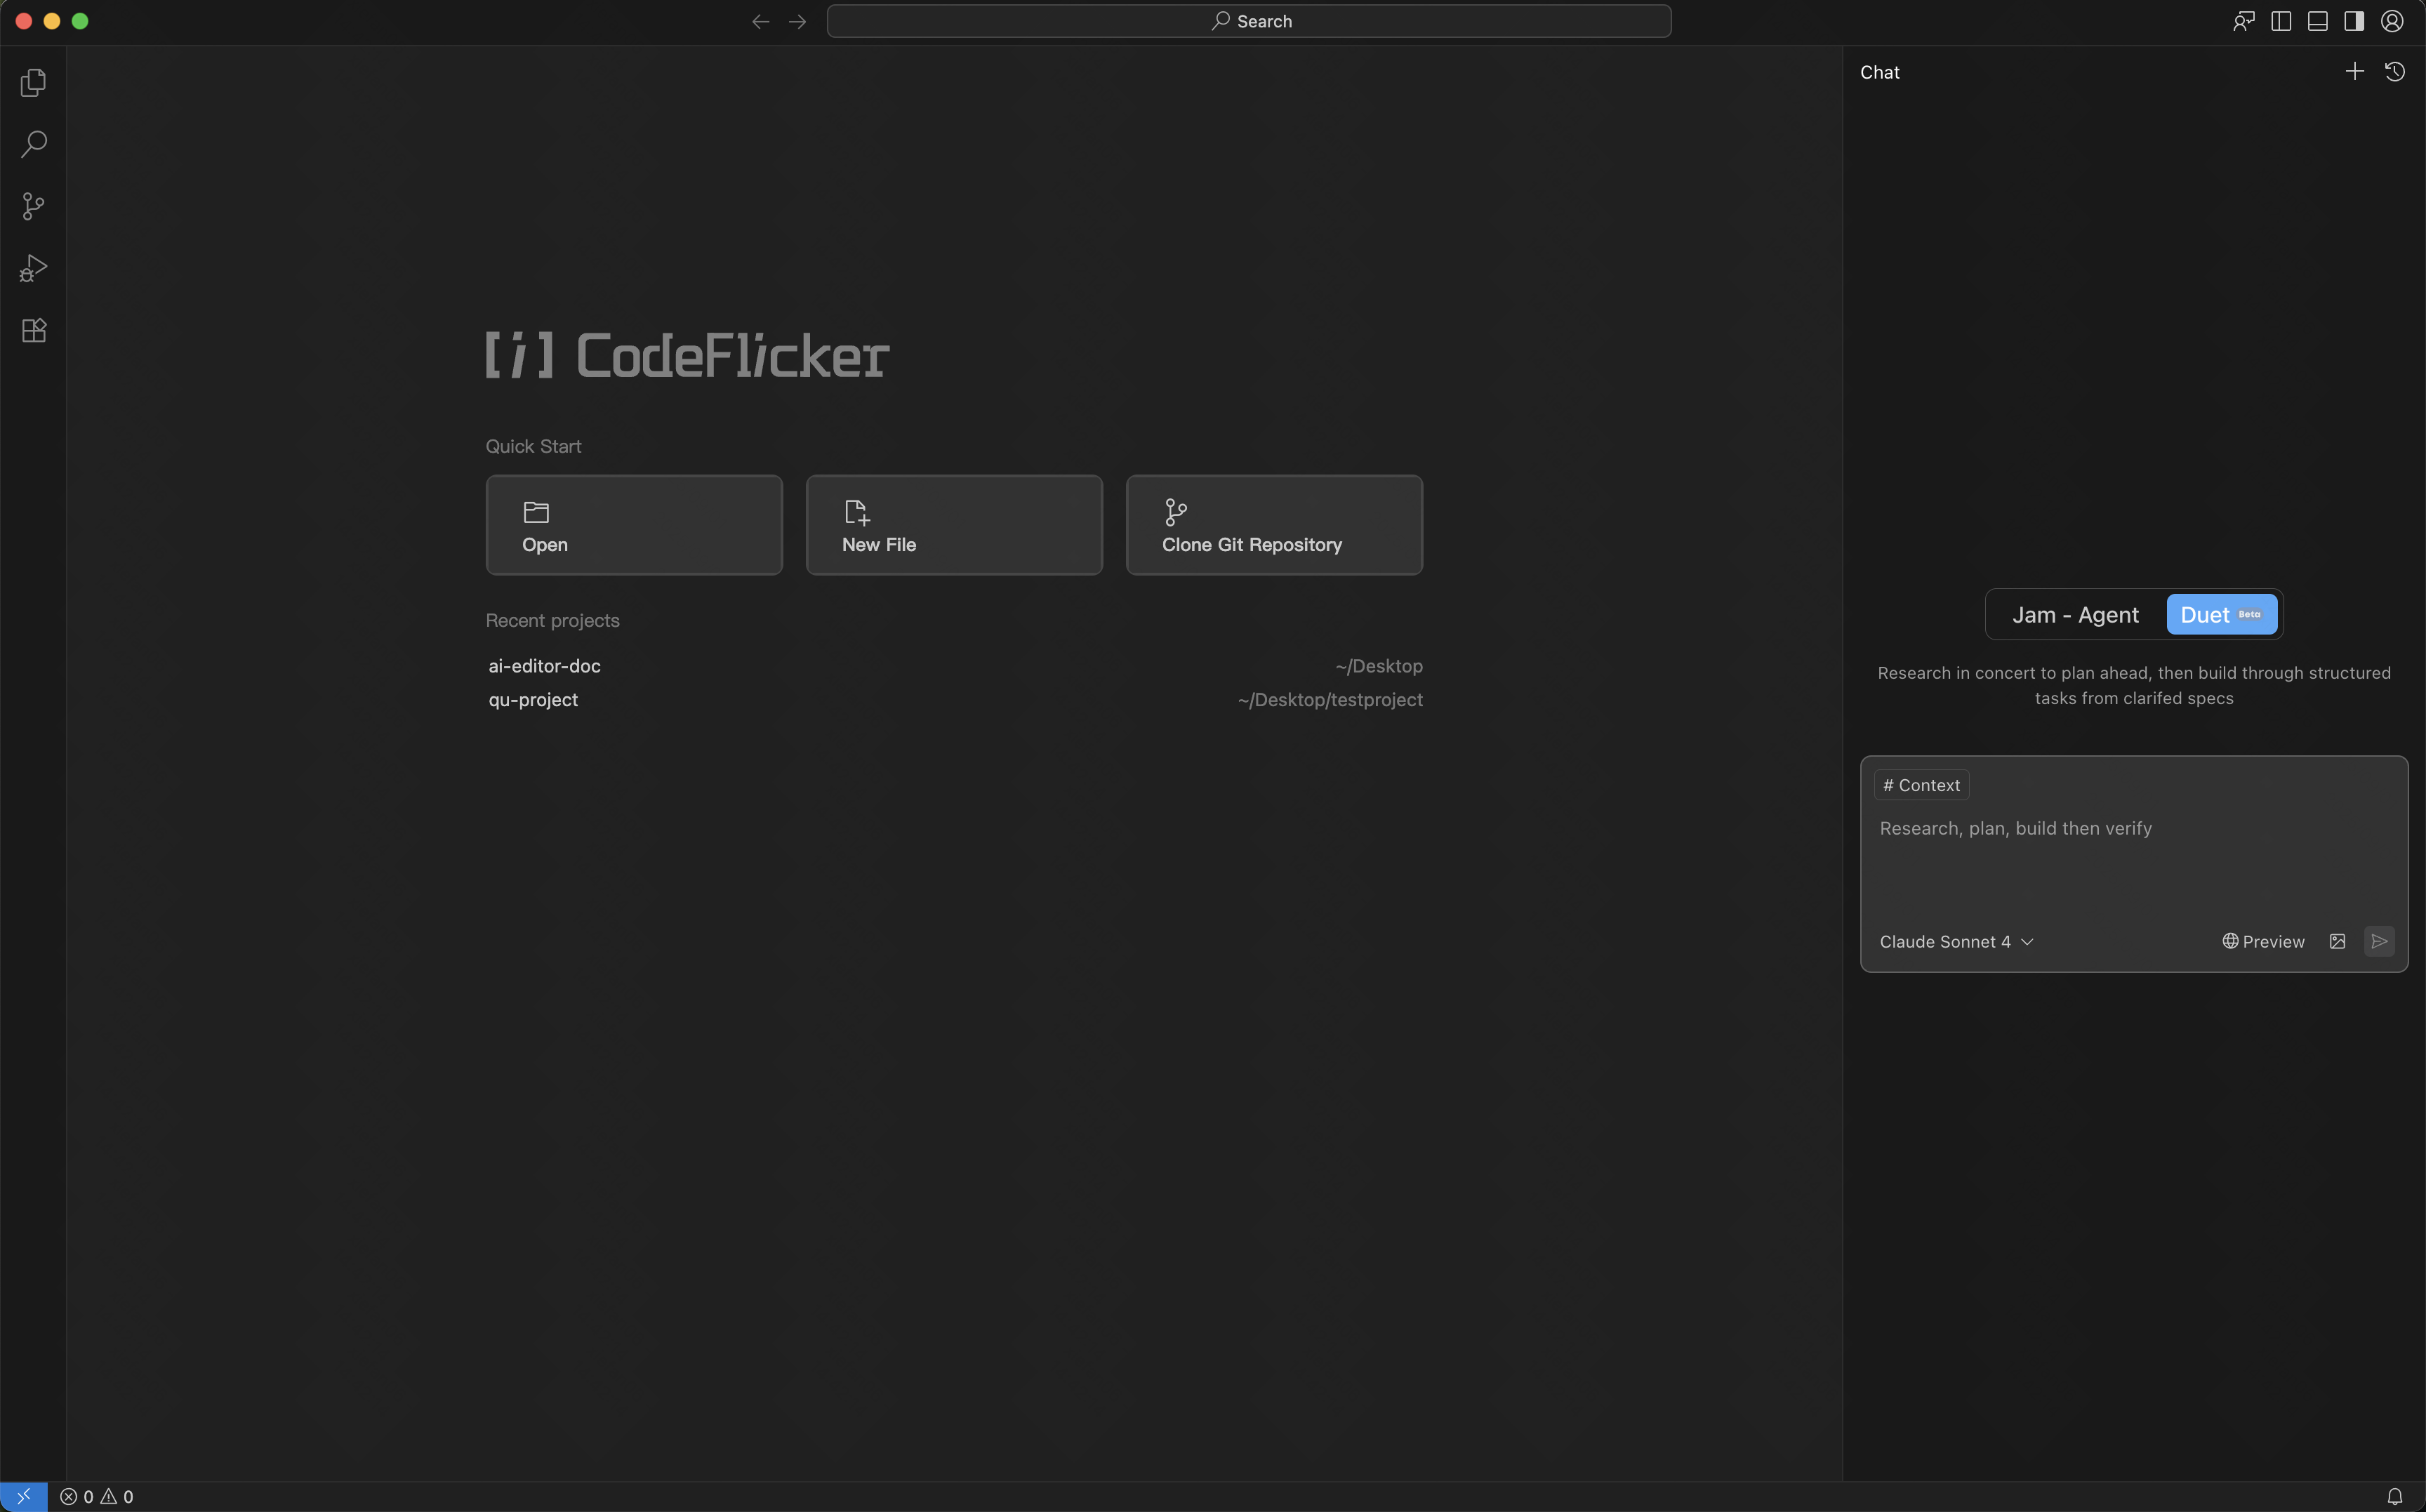
Duet Mode
Duet (/duˈet/) mode is a human-AI deep collaboration development mode designed for complex tasks. It mimics the natural behavior of human expert teams solving complex requirements, emphasizing early consensus building through deep discussion, analysis, and research based on requirements, formulating systematic technical design plans, then executing through division of labor.
Research Phase
Generate coarse-grained research outline plan based on user original input, clarifying goals and boundaries through questions.
Action Phase
Use deep search and tool calling capabilities for comprehensive research, generating standardized user stories and technical design.
Review Phase
Autonomously plan and break down documents into executable and trackable detailed development tasks.
Core Concepts
| Concept | Definition |
|---|---|
| Research Plan | Coarse-grained research outline plan generated based on user original input, clarifying goals and boundaries through questions. |
| User Story (requirement.md) | Structured user stories that transform user input into clear, complete, testable/acceptable, and trackable requirements. |
| Technical Design (design.md) | Overall view of complex project engineering, including system architecture, key implementations/components/modules, and sequence diagram interactions. |
| Development Tasks (To-dos) | Independent executable and trackable development tasks, each with clear description, expected results, and necessary dependency definitions. |
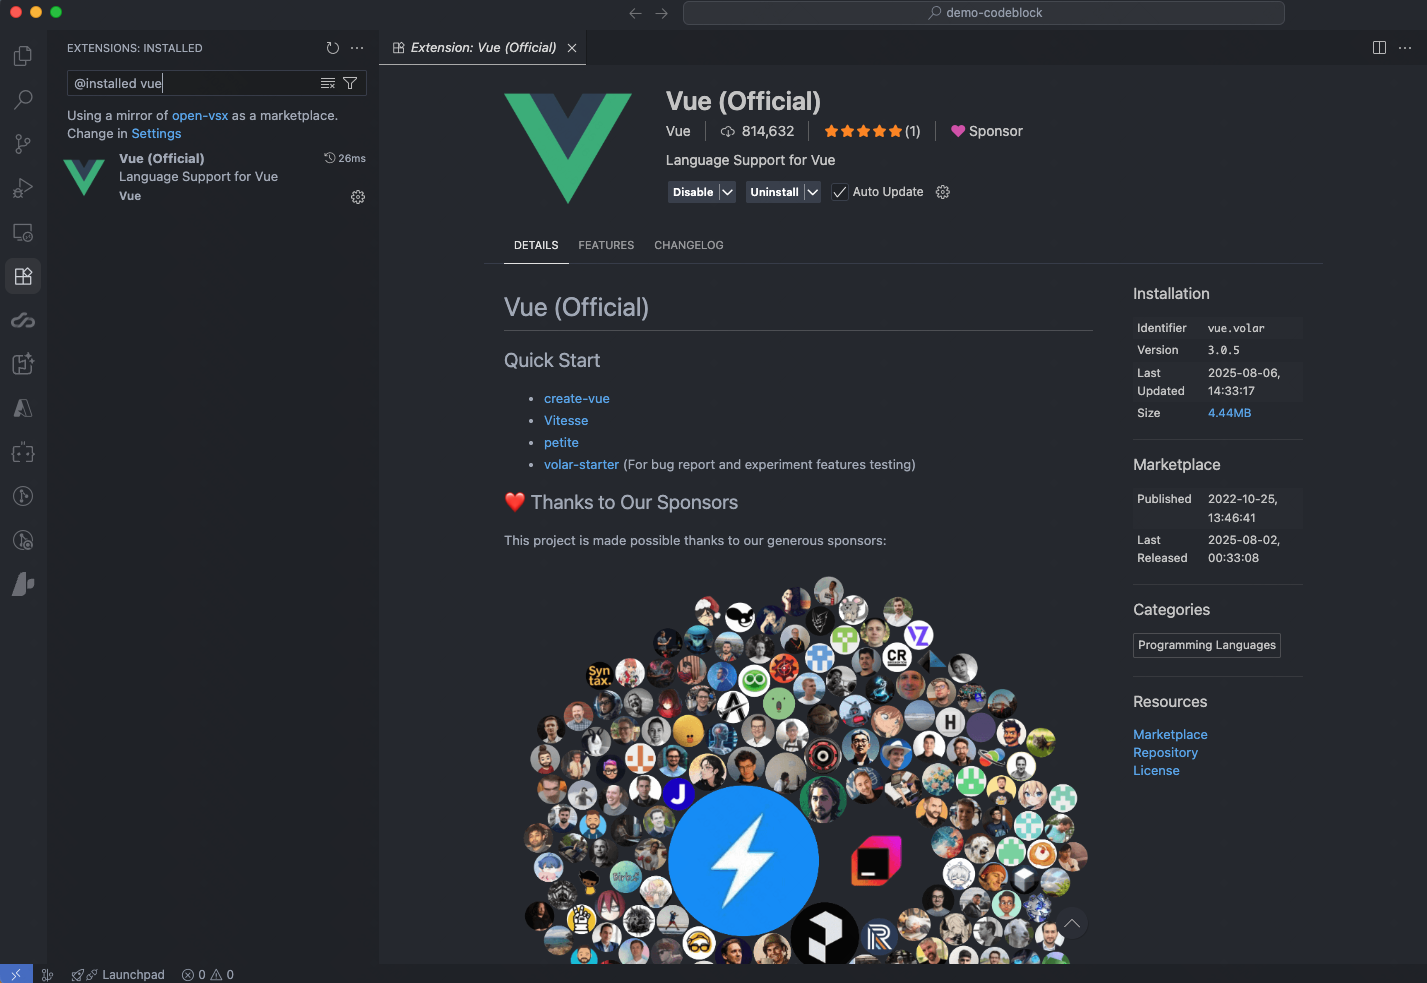
Extension Management
The IDE provides comprehensive extension management features, including installation, deactivation, and deletion operations. Extensions can be added to the IDE through multiple channels: built-in extension marketplace, VS Code official marketplace, or direct import of local .vsix packages.
Install via Built-in Extension Marketplace
Step 1: Open Extension Marketplace
Click the extension marketplace icon in the left sidebar to open the extension marketplace panel.

Step 2: Browse and Install
Browse or search for the desired extension in the available section, select the extension to view details, then click the install button.
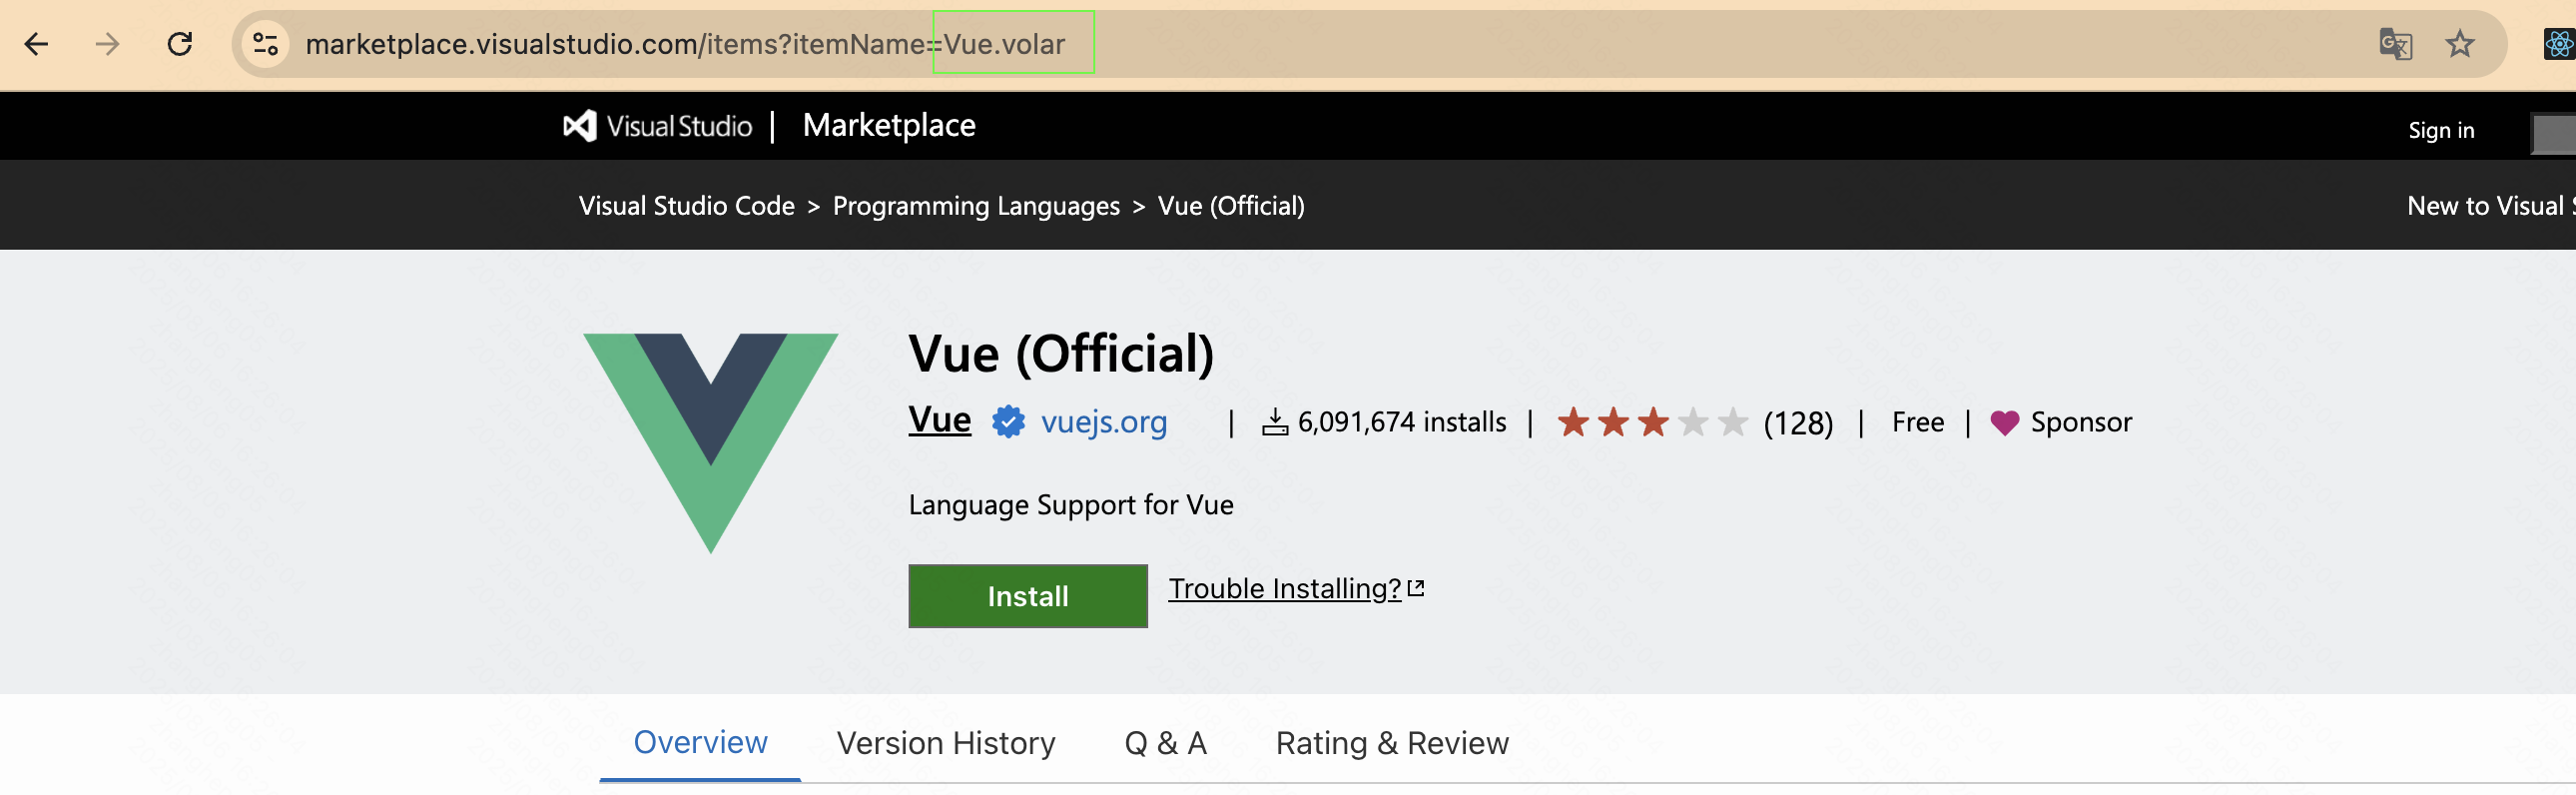
Install via VS Code Marketplace
Get Extension Information
When the desired extension is not available in the built-in marketplace, you can obtain it from the VS Code official marketplace. Need to collect the following information:
- • itemName: The itemName parameter in the URL
- • version: Version number
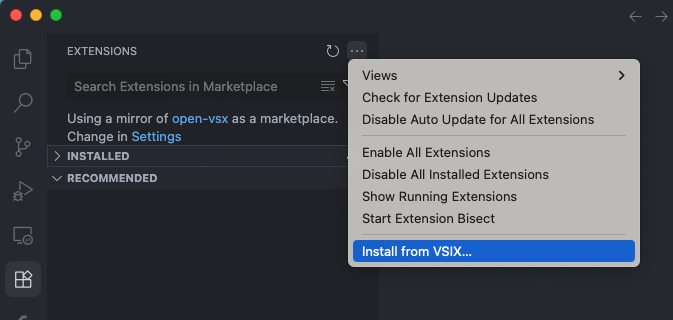
Install via Local VSIX File
Installation Steps
Access the extension marketplace, locate the menu button (···) in the upper right corner of the panel, select "Install from VSIX", then select the desired .vsix file.
Disable Extension
Find the target extension in the installed section, hover over the extension entry and select Settings > Disable.

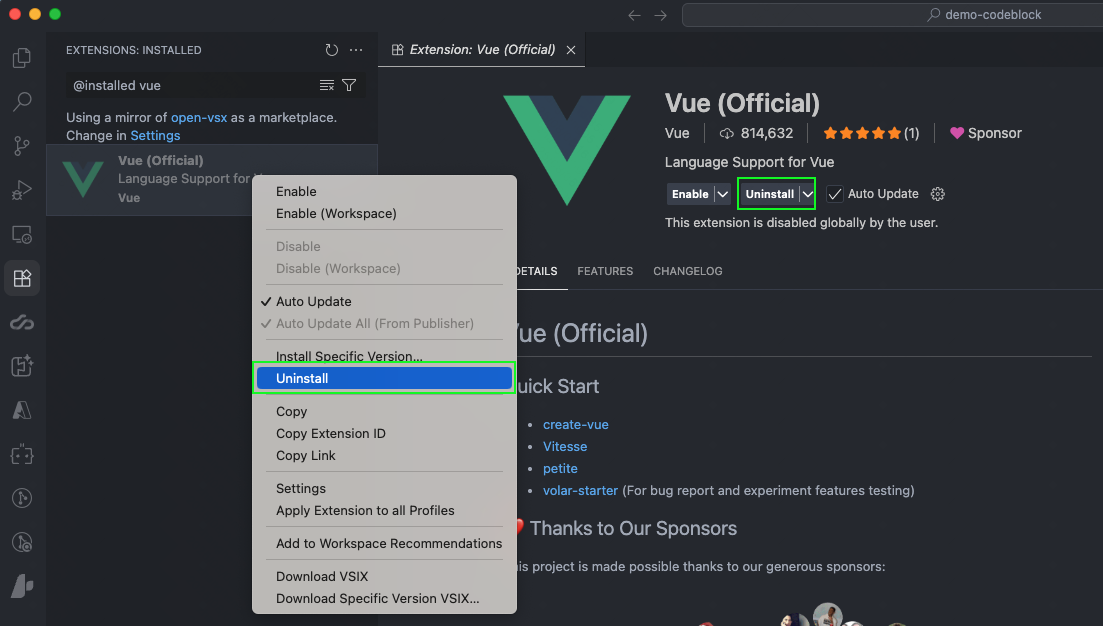
Delete Extension
Find the extension to delete in the installed section, right-click or hover to select uninstall.
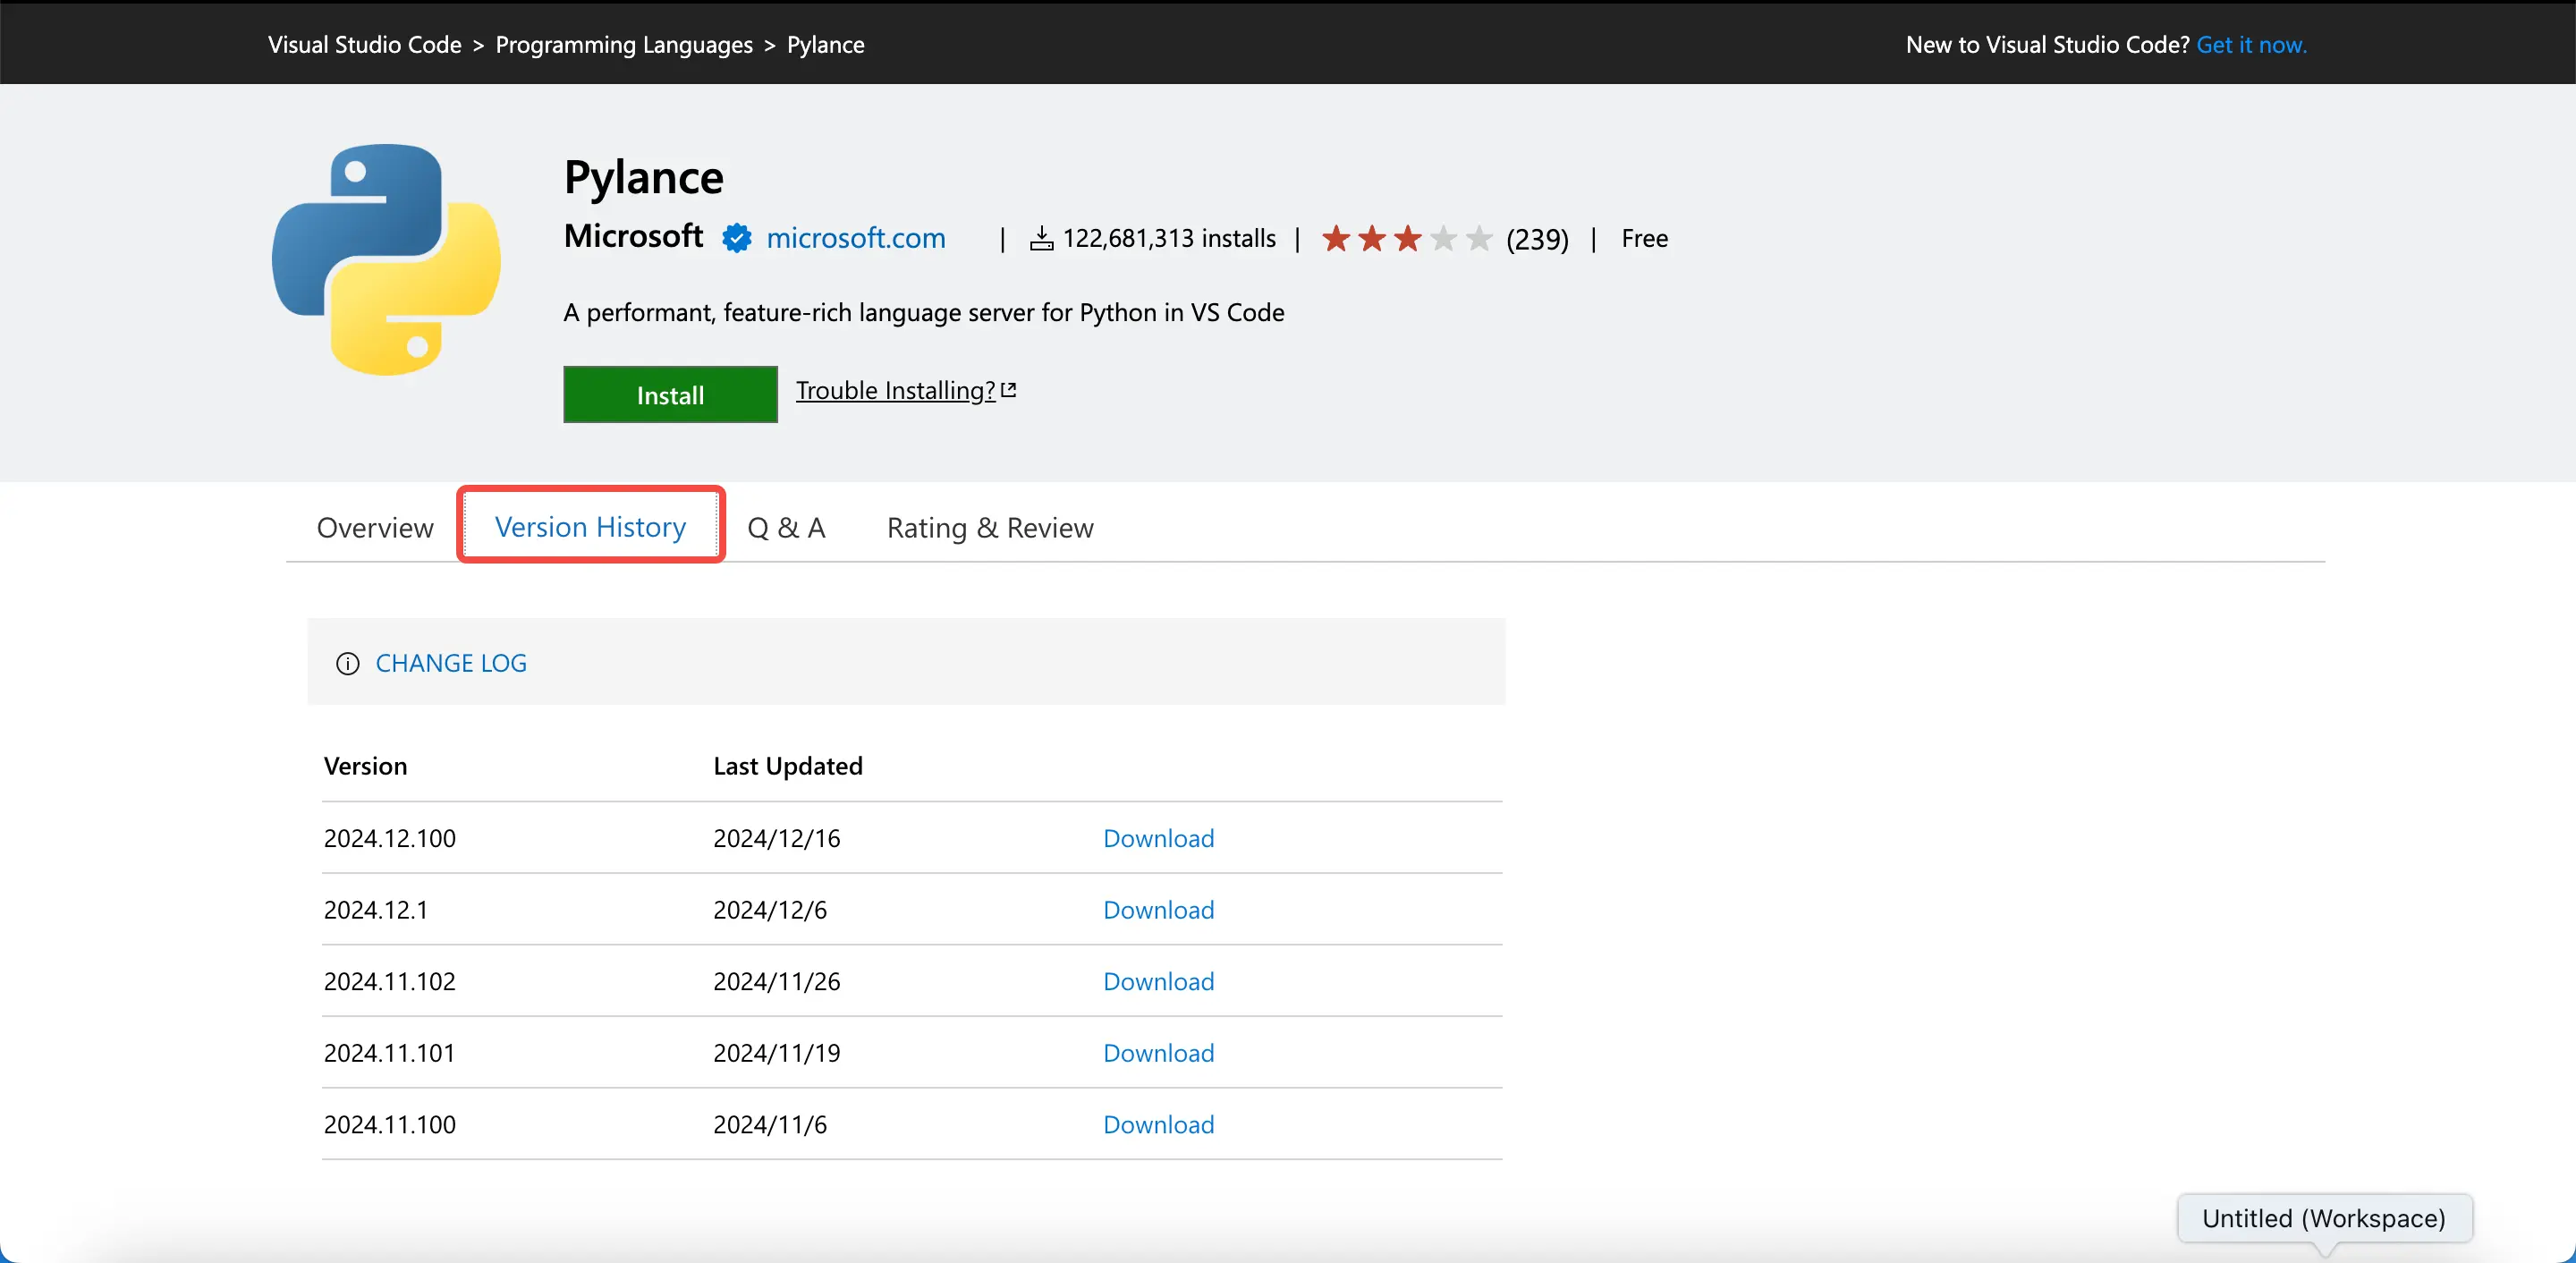
Troubleshooting
When extension versions depend on newer VS Code APIs, compatibility conflicts may occur with the IDE. Solution:
- • Check the extension's version history
- • Select an earlier compatible version for download
Figma to Code
The Figma to code feature enables AI programming in agent mode to convert your input Figma designs into corresponding frontend web implementations. Compared to Figma MCP functionality, our design restoration is more accurate and clear.
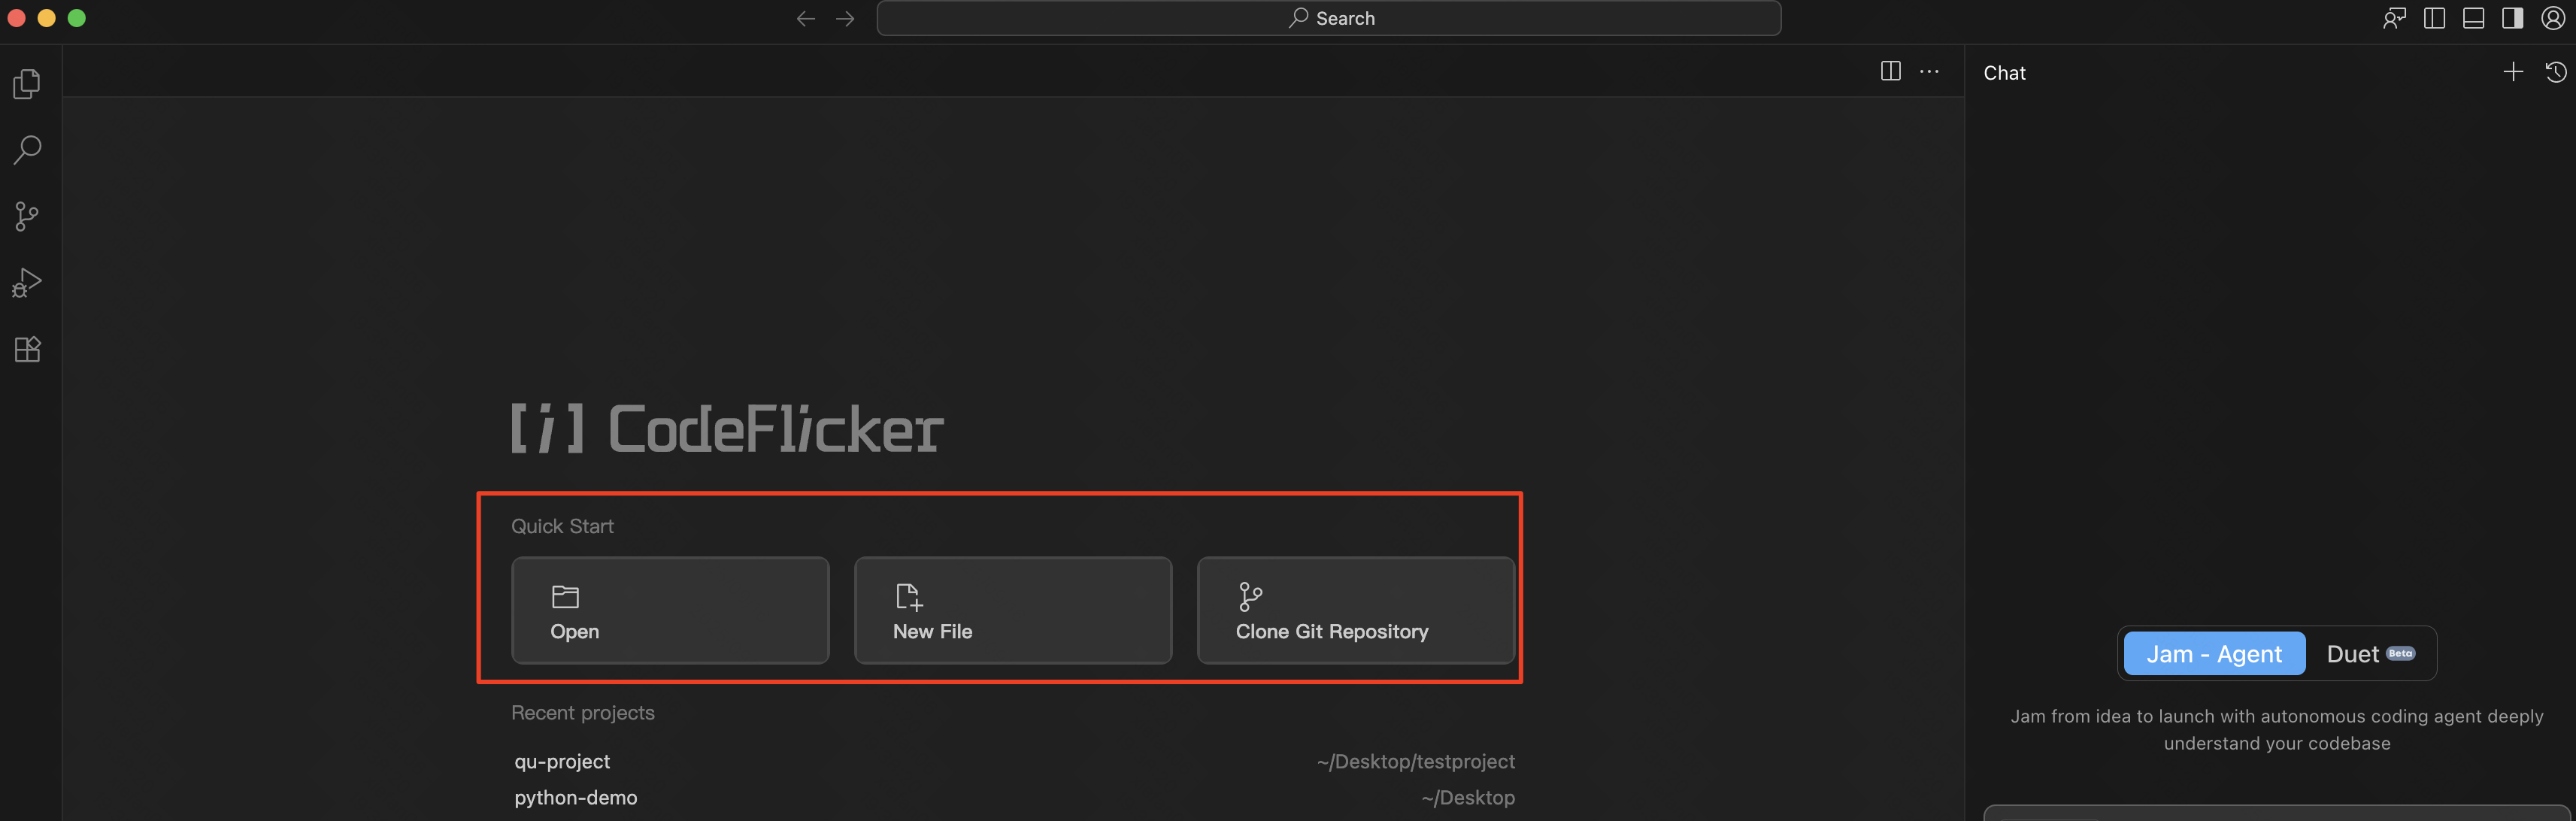
Step 1: Select Project Directory
Open the IDE and select a project directory.
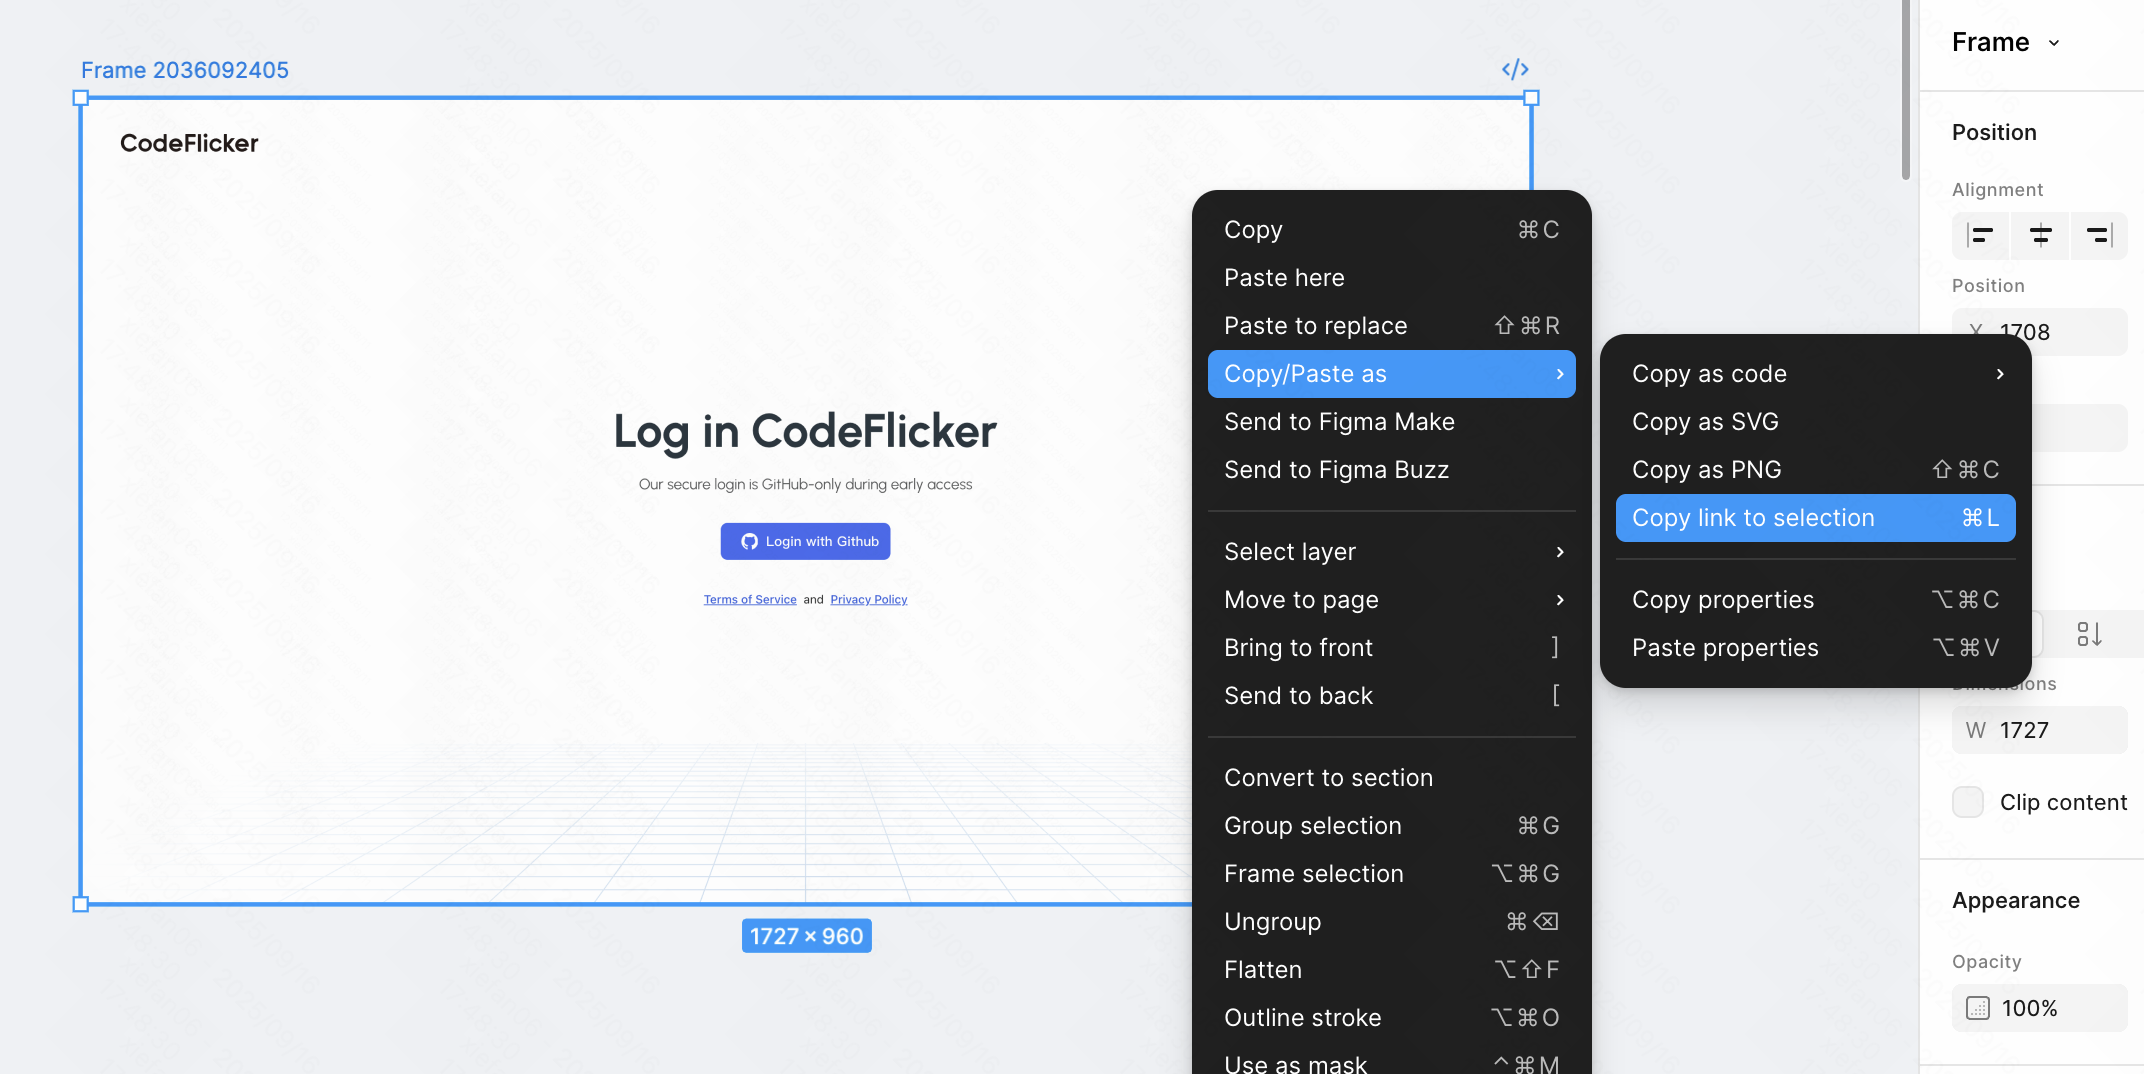
Step 2: Copy Figma Link
On the Figma page, select the corresponding design node, then right-click and select Copy/Paste as > Copy link to selection.
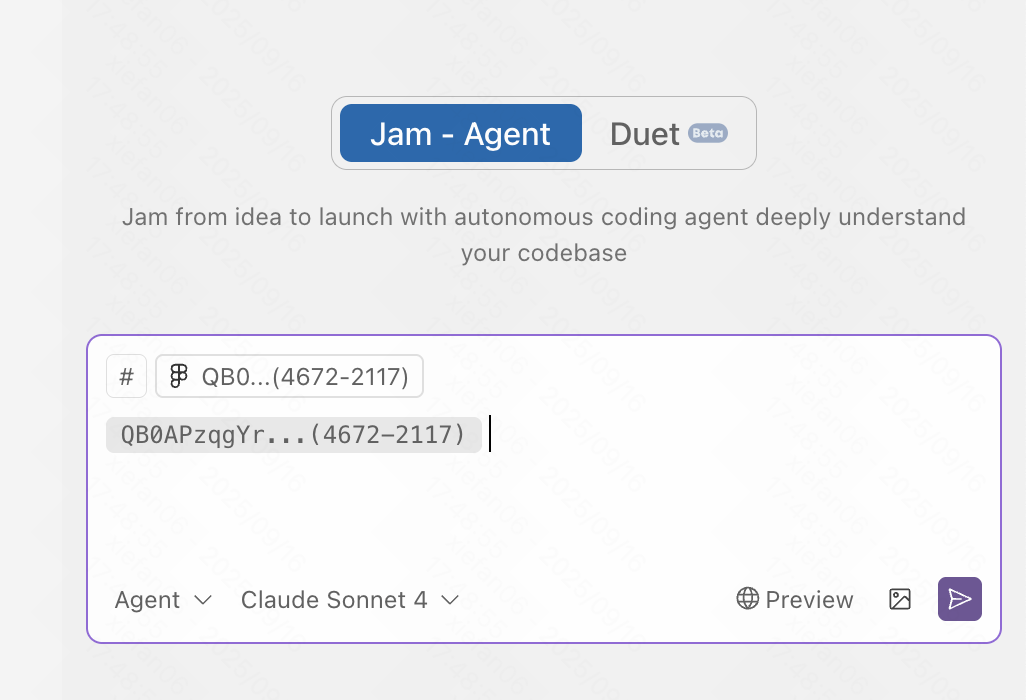
Step 3: Input to Agent Mode
Paste the copied URL into CodeFlicker's agent mode input, enter your requirements and send, then complete Figma authorization as prompted.
Preview Feature
The preview feature allows the Agent to identify web project "startup scripts" and run corresponding local services. You can choose to view pages within the IDE or in a browser.
Auto-Detect Startup Scripts
- • npm run dev
- • yarn dev
- • pnpm dev
- • Other custom startup commands
Preview Mode Selection
- • IDE embedded preview
- • Standalone browser preview
- • Auto-parse service address
- • Real-time hot reload
Interactive Debug Toolbar
Pages opened via preview have a debug toolbar in the bottom right corner, supporting element selection and sending console errors.
Browser Mode
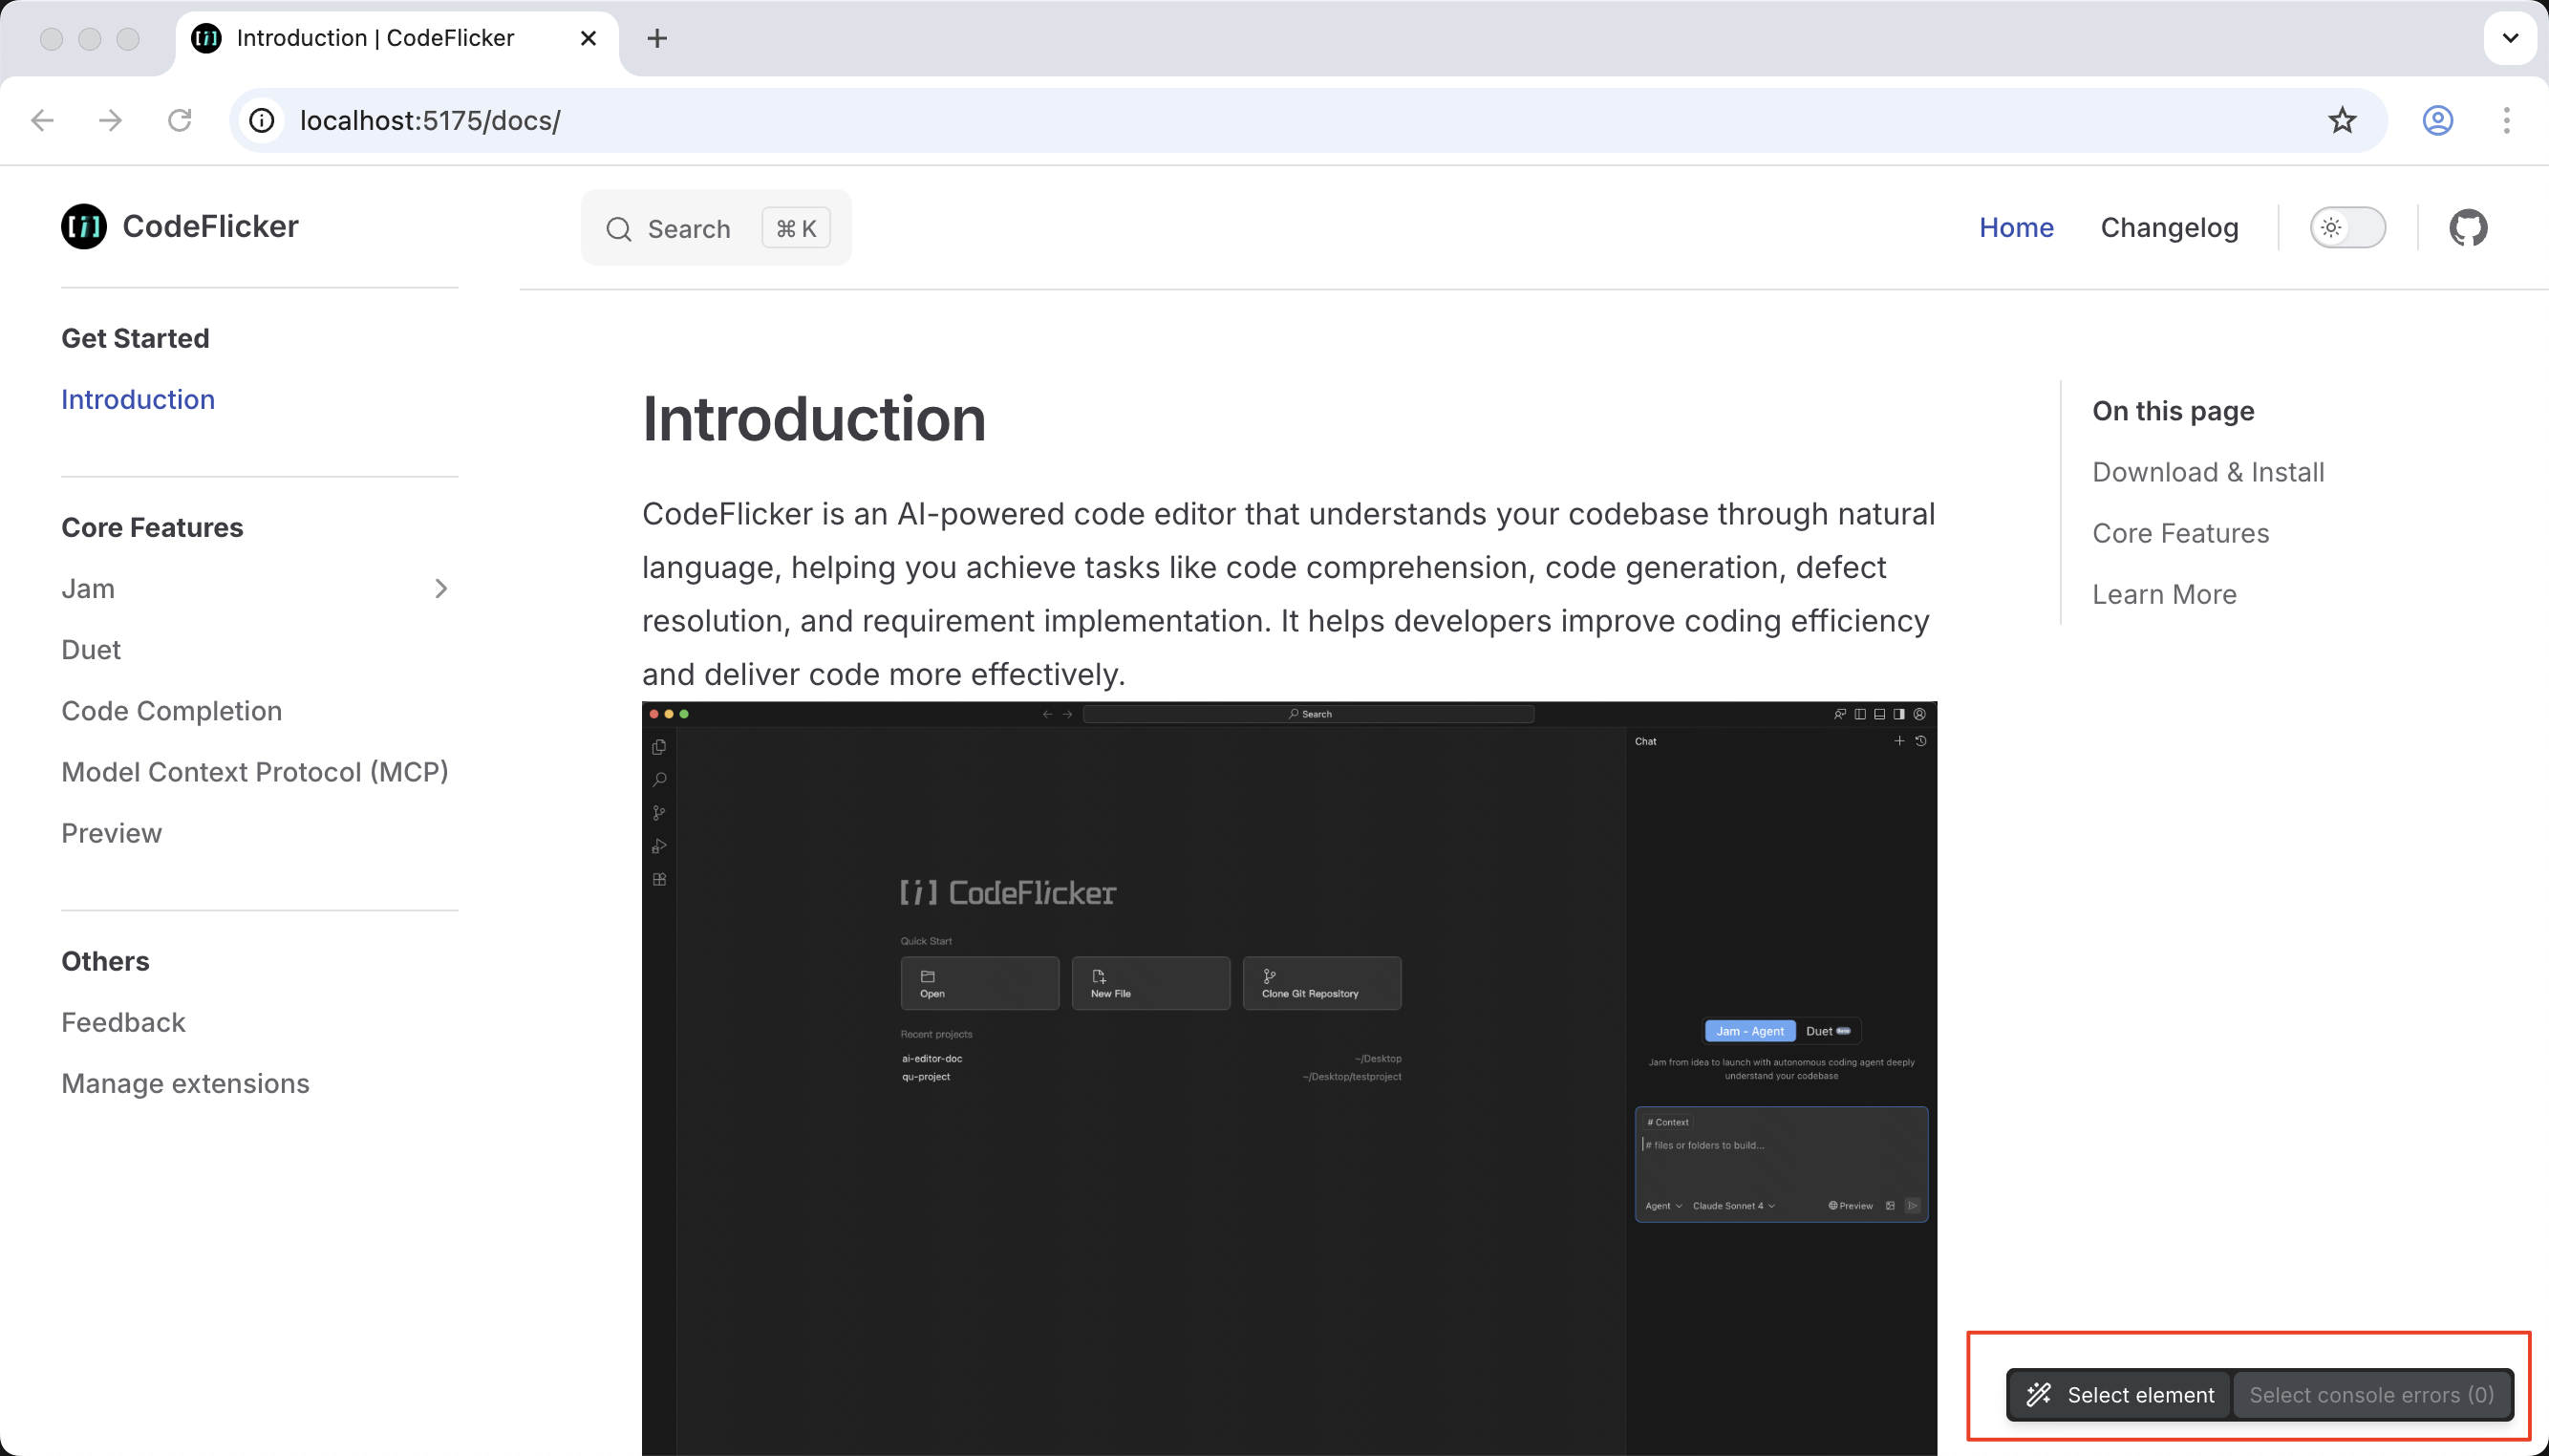
IDE Mode
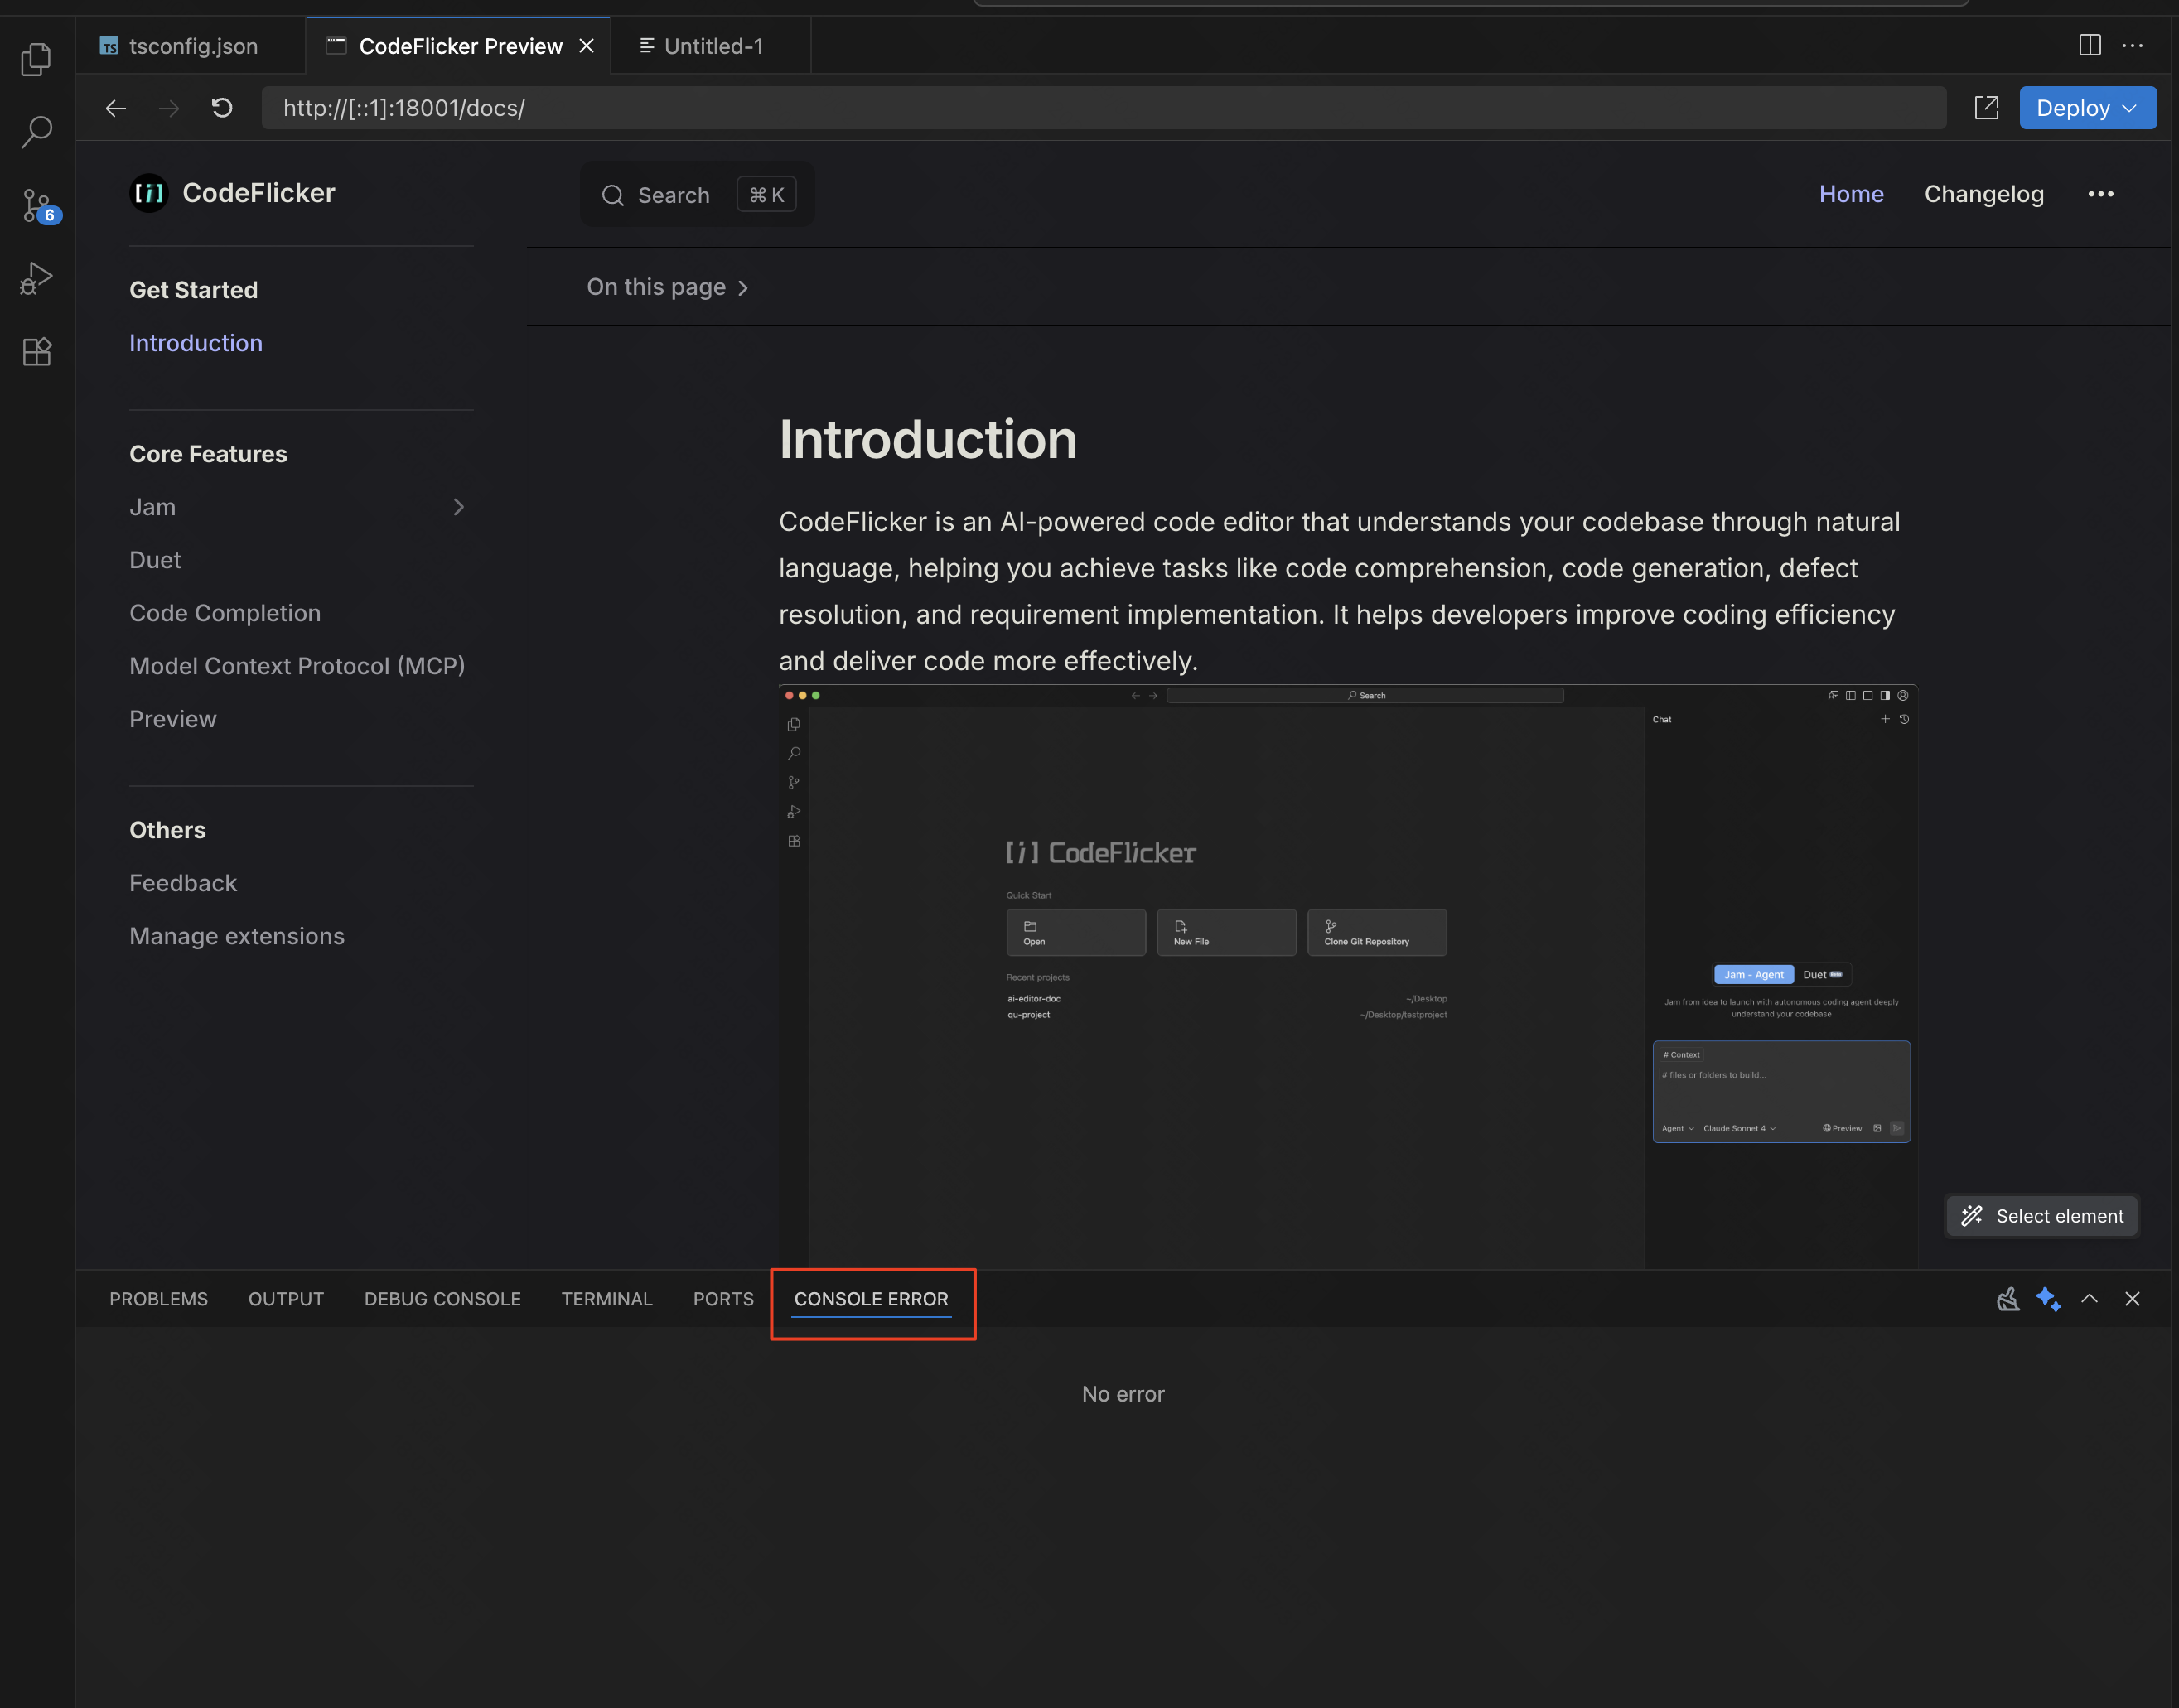
Element Selection Feature
Clicking target elements on the page sends corresponding DOM element information to the IDE. You can chat with the Agent directly based on the currently selected element's context, without needing to describe UI-related changes in text.
Use shortcut key (cmd+i) within the page to invoke this feature.
Supported Frontend Framework Versions
| Feature | React 16 | React 18 | React 19 | Vue 2 | Vue 3 |
|---|---|---|---|---|---|
| tagName | ✅ | ✅ | ✅ | ✅ | ✅ |
| class | ✅ | ✅ | ✅ | ✅ | ✅ |
| attributes | ✅ | ✅ | ✅ | ✅ | ✅ |
| path | ✅ | ✅ | ❌ | ✅ | ✅ |
| Start line number | ✅ | ✅ | ❌ | ❌ | ✅ |
| End line number | ❌ | ❌ | ❌ | ❌ | ❌ |
| style | ✅ | ✅ | ✅ | ✅ | ✅ |
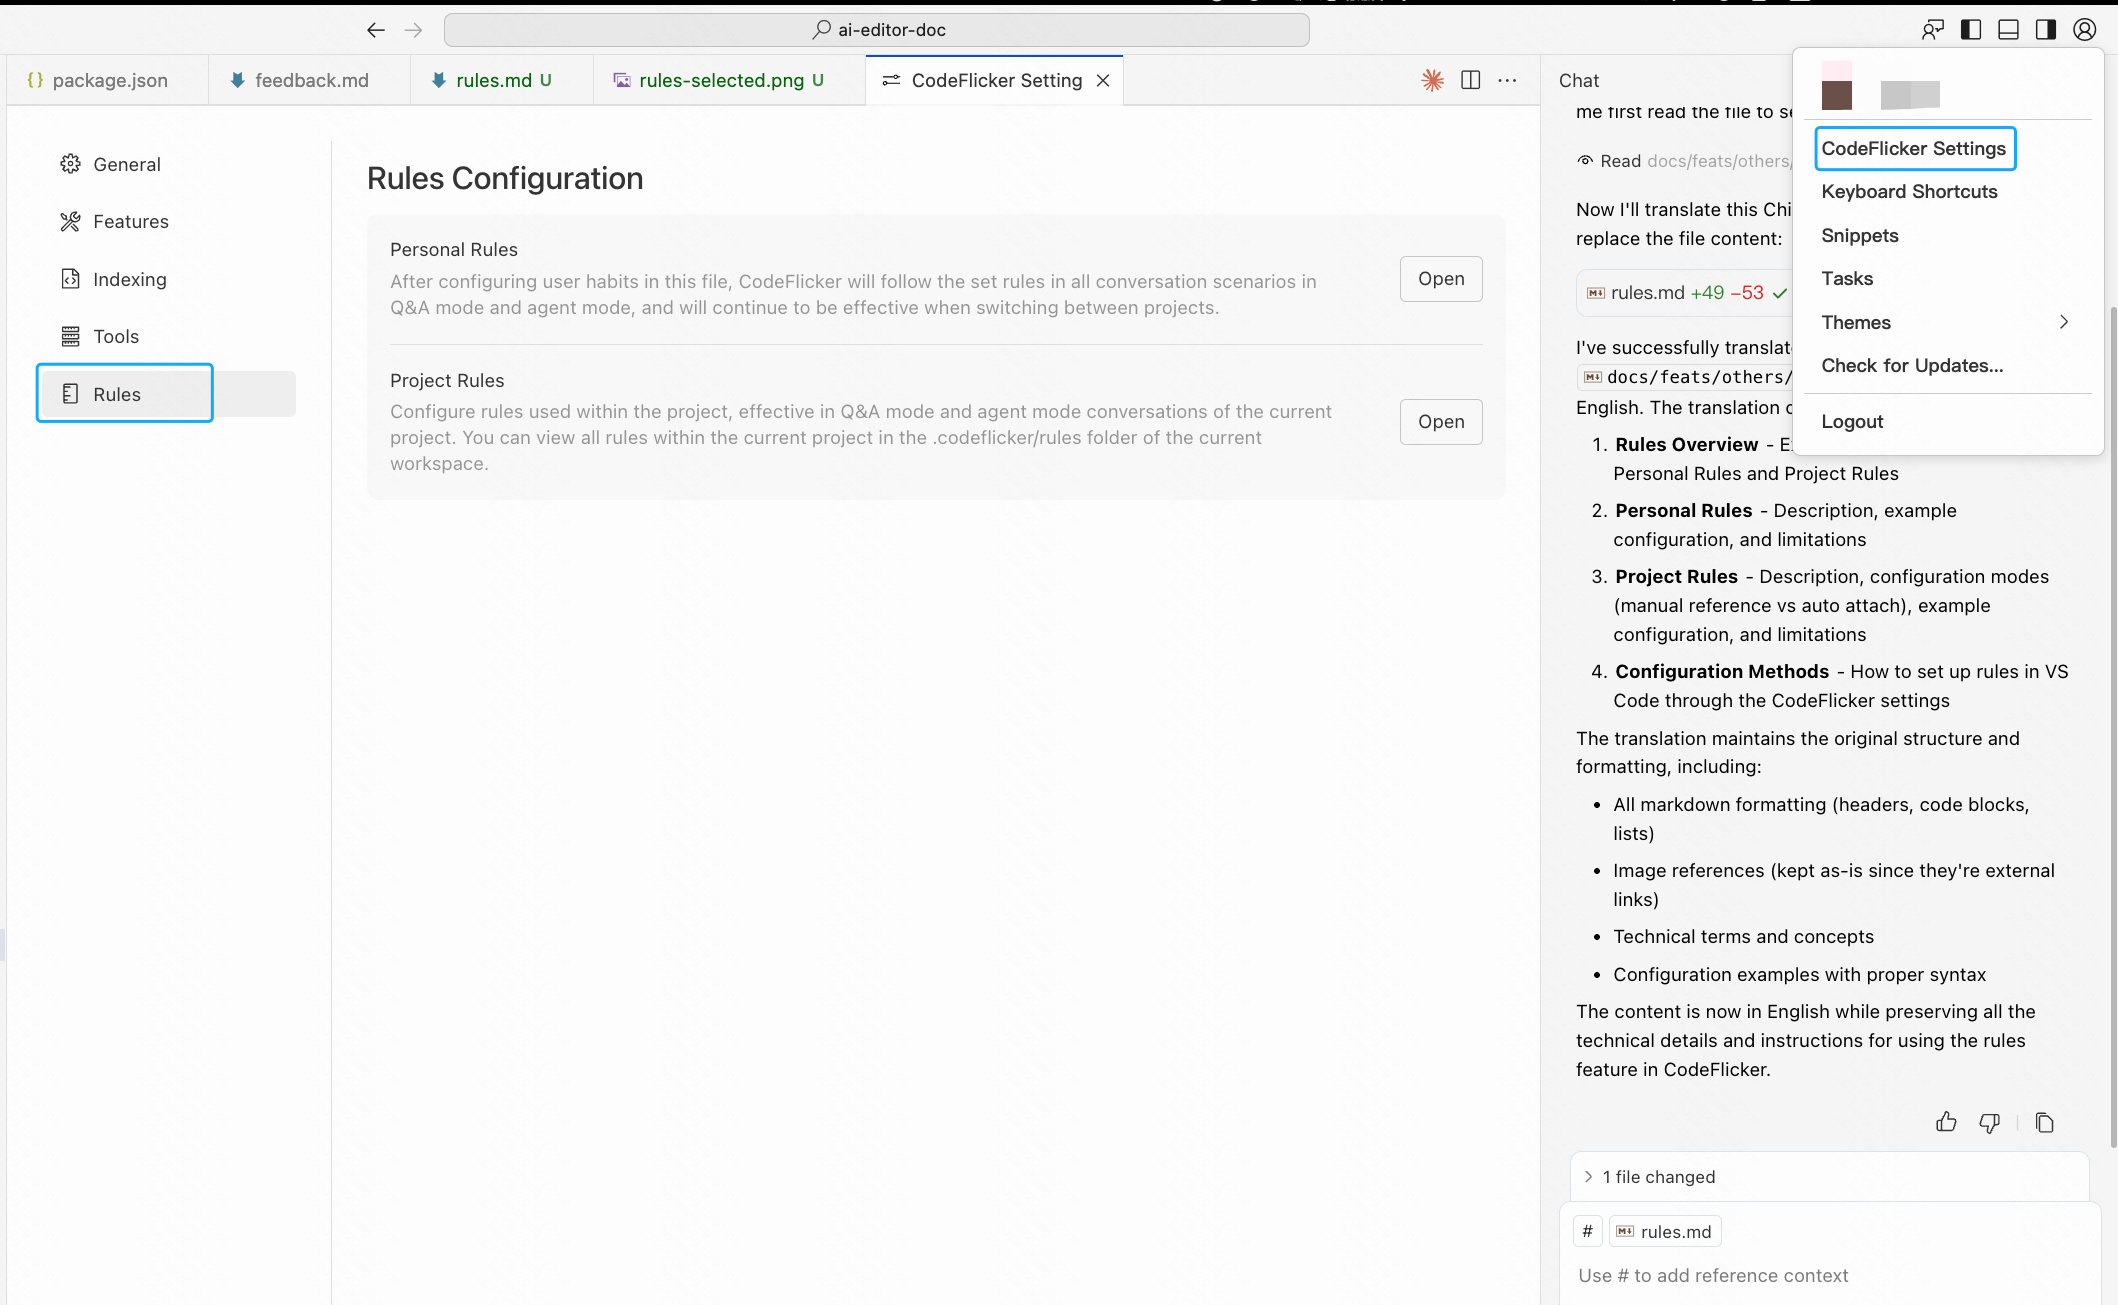
Custom Rules
CodeFlicker provides two ways to customize AI behavior: personal rules and project rules.
Personal Rules
- • Reflects personal usage habits and preferences
- • Consistent across all conversations and projects
- • Maximum 5000 characters
- • Stored in .codeflicker folder in user root directory
Project Rules
- • Specific to workspace projects
- • Supports manual reference or auto-attach
- • Stored in project .codeflicker/rules directory
- • Supports multiple rule files
Configuration Methods
Method 1: Create in Settings
Open CodeFlicker Settings > Navigate to Rules Settings > Configure your rules
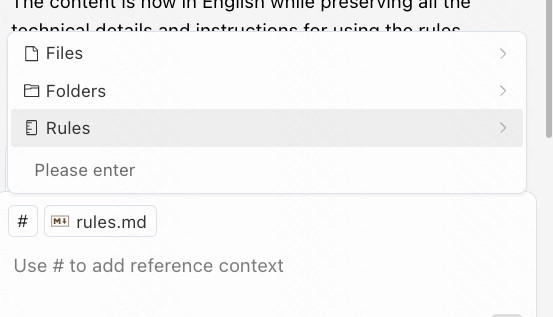
Manual Reference Rules
Rules that only take effect when explicitly added in #Knowledge-Rules
Model Context Protocol (MCP)
What is MCP
Model Context Protocol (MCP) is a protocol that allows Large Language Models (LLMs) to access custom tools and services. Agents in CodeFlicker can act as MCP clients, choosing to make requests to MCP servers to use the tools they provide. You can add MCP servers yourself and integrate them for use in custom agents.
For more details, visit: MCP Official Website
CodeFlicker IDE-MCP Management
CodeFlicker supports integrating MCP servers, which can extend its capabilities by providing tools or functionality to CodeFlicker through MCP.
Special Notice
MCP servers are built and maintained by third parties. CodeFlicker cannot review or guarantee the validity, stability, or authenticity of data returned by these services. Use with caution. Due to relevant laws and regulations, network restrictions, or the servers' own access policies, some MCP servers may also be unavailable.
Configuration Entry
Note that some MCP servers may use commands like npx or uvx, please install related tools in advance.
- • Open CodeFlicker Settings → Find MCP Management → Open MCP Configuration to enter setup
- • You can also find the "MCP" shortcut in CodeFlicker agent's conversation area
Add MCP Server
- • Click "Manual Configuration" on the MCP management page to open MCP config file
- • Write corresponding MCP server's configuration information to take effect
- • Copy configuration to IDE's config file, takes effect after saving config file (cmd+s)
- • After adding, the connection status of services can be displayed on the config page, manually enable or disable MCP servers
MCP in Conversations
After successfully adding MCP, you can view enabled MCP servers in the agent mode MCP button. CodeFlicker agent will call these MCP servers when needed.
VS Code Workspace Usage Guide
The current agent mode does not support VS Code workspaces. If you need to use agent mode, you can try opening code repositories in single-repository mode in VS Code.
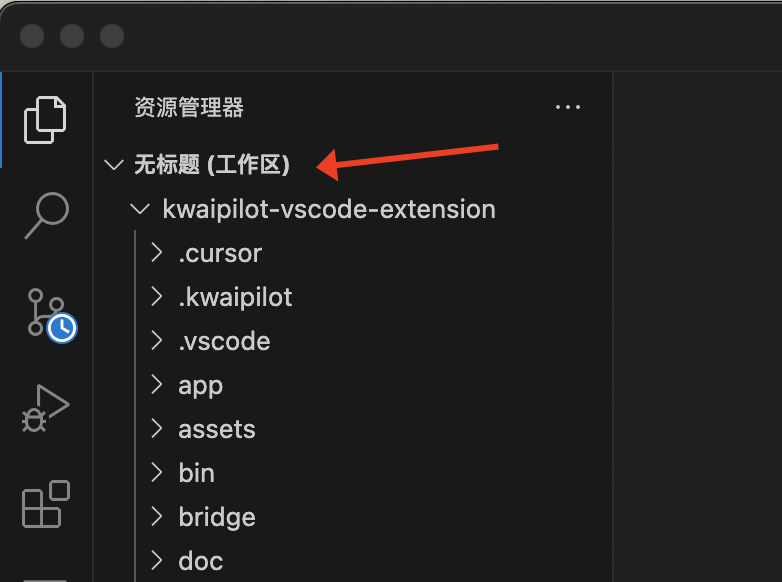
What is Workspace Mode?
If files/folders are added through the following paths, a "workspace" definition will exist in the VS Code directory. Agent chat is currently not supported in this mode.
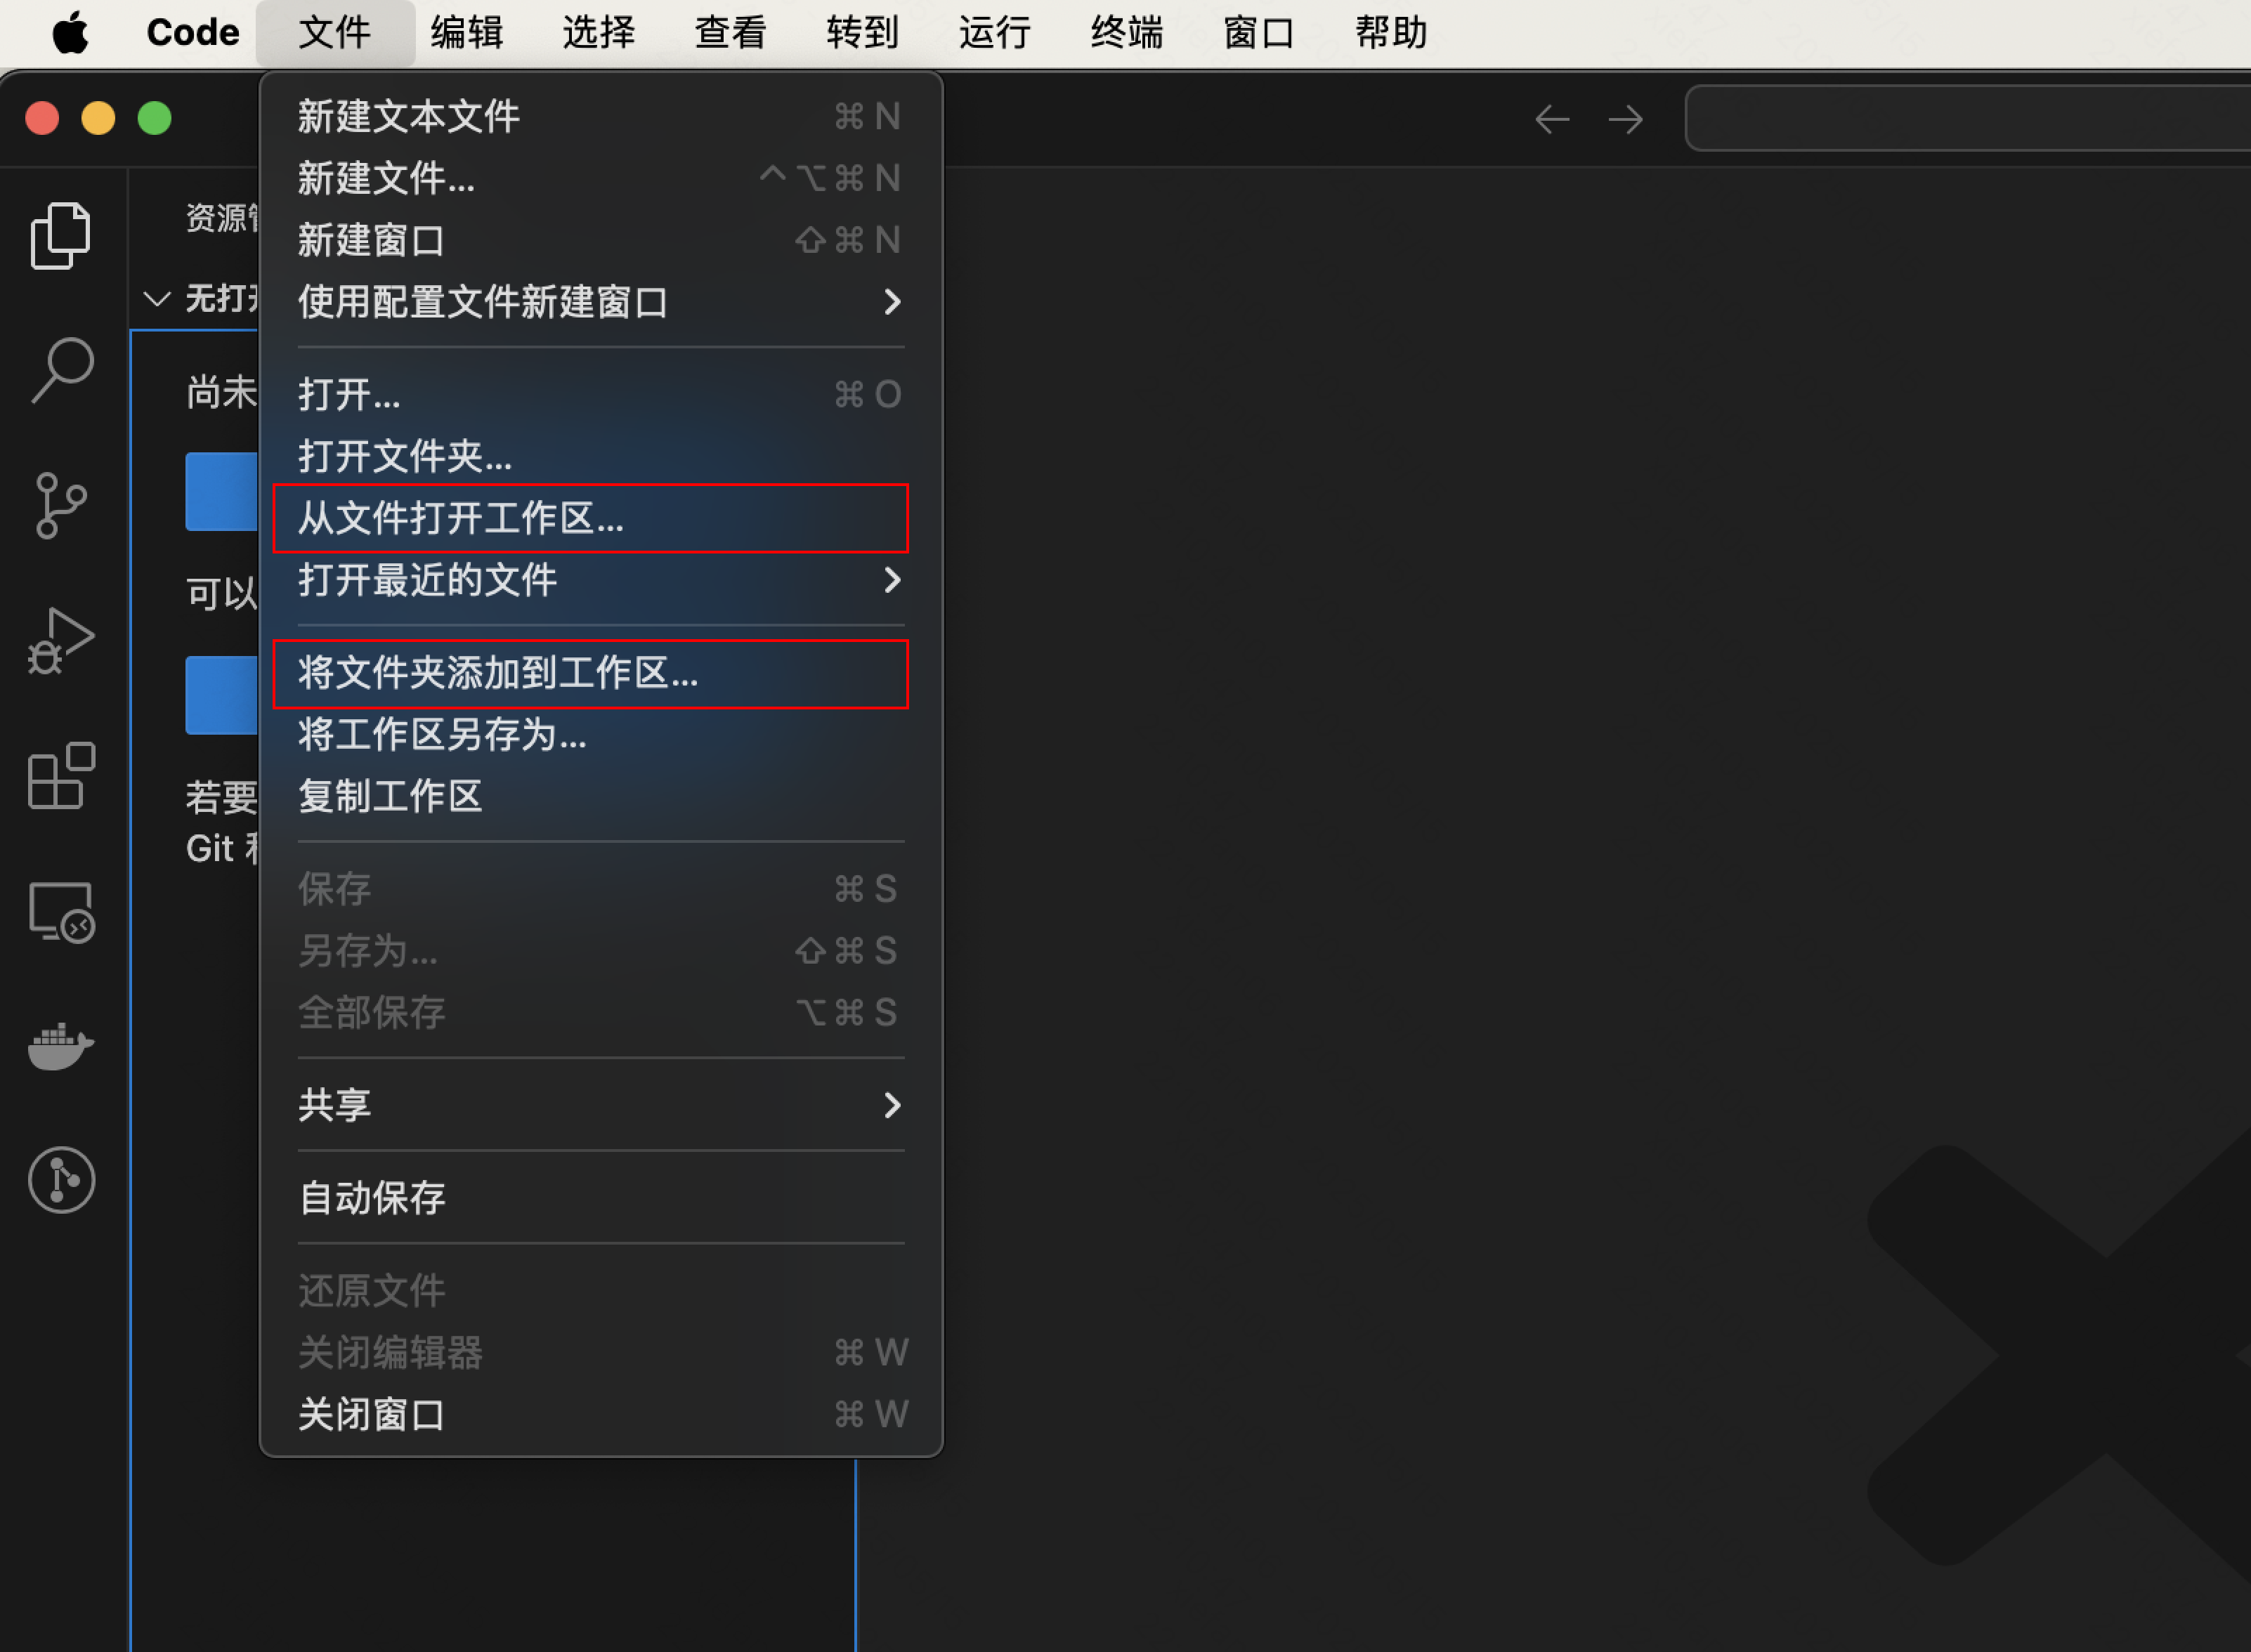
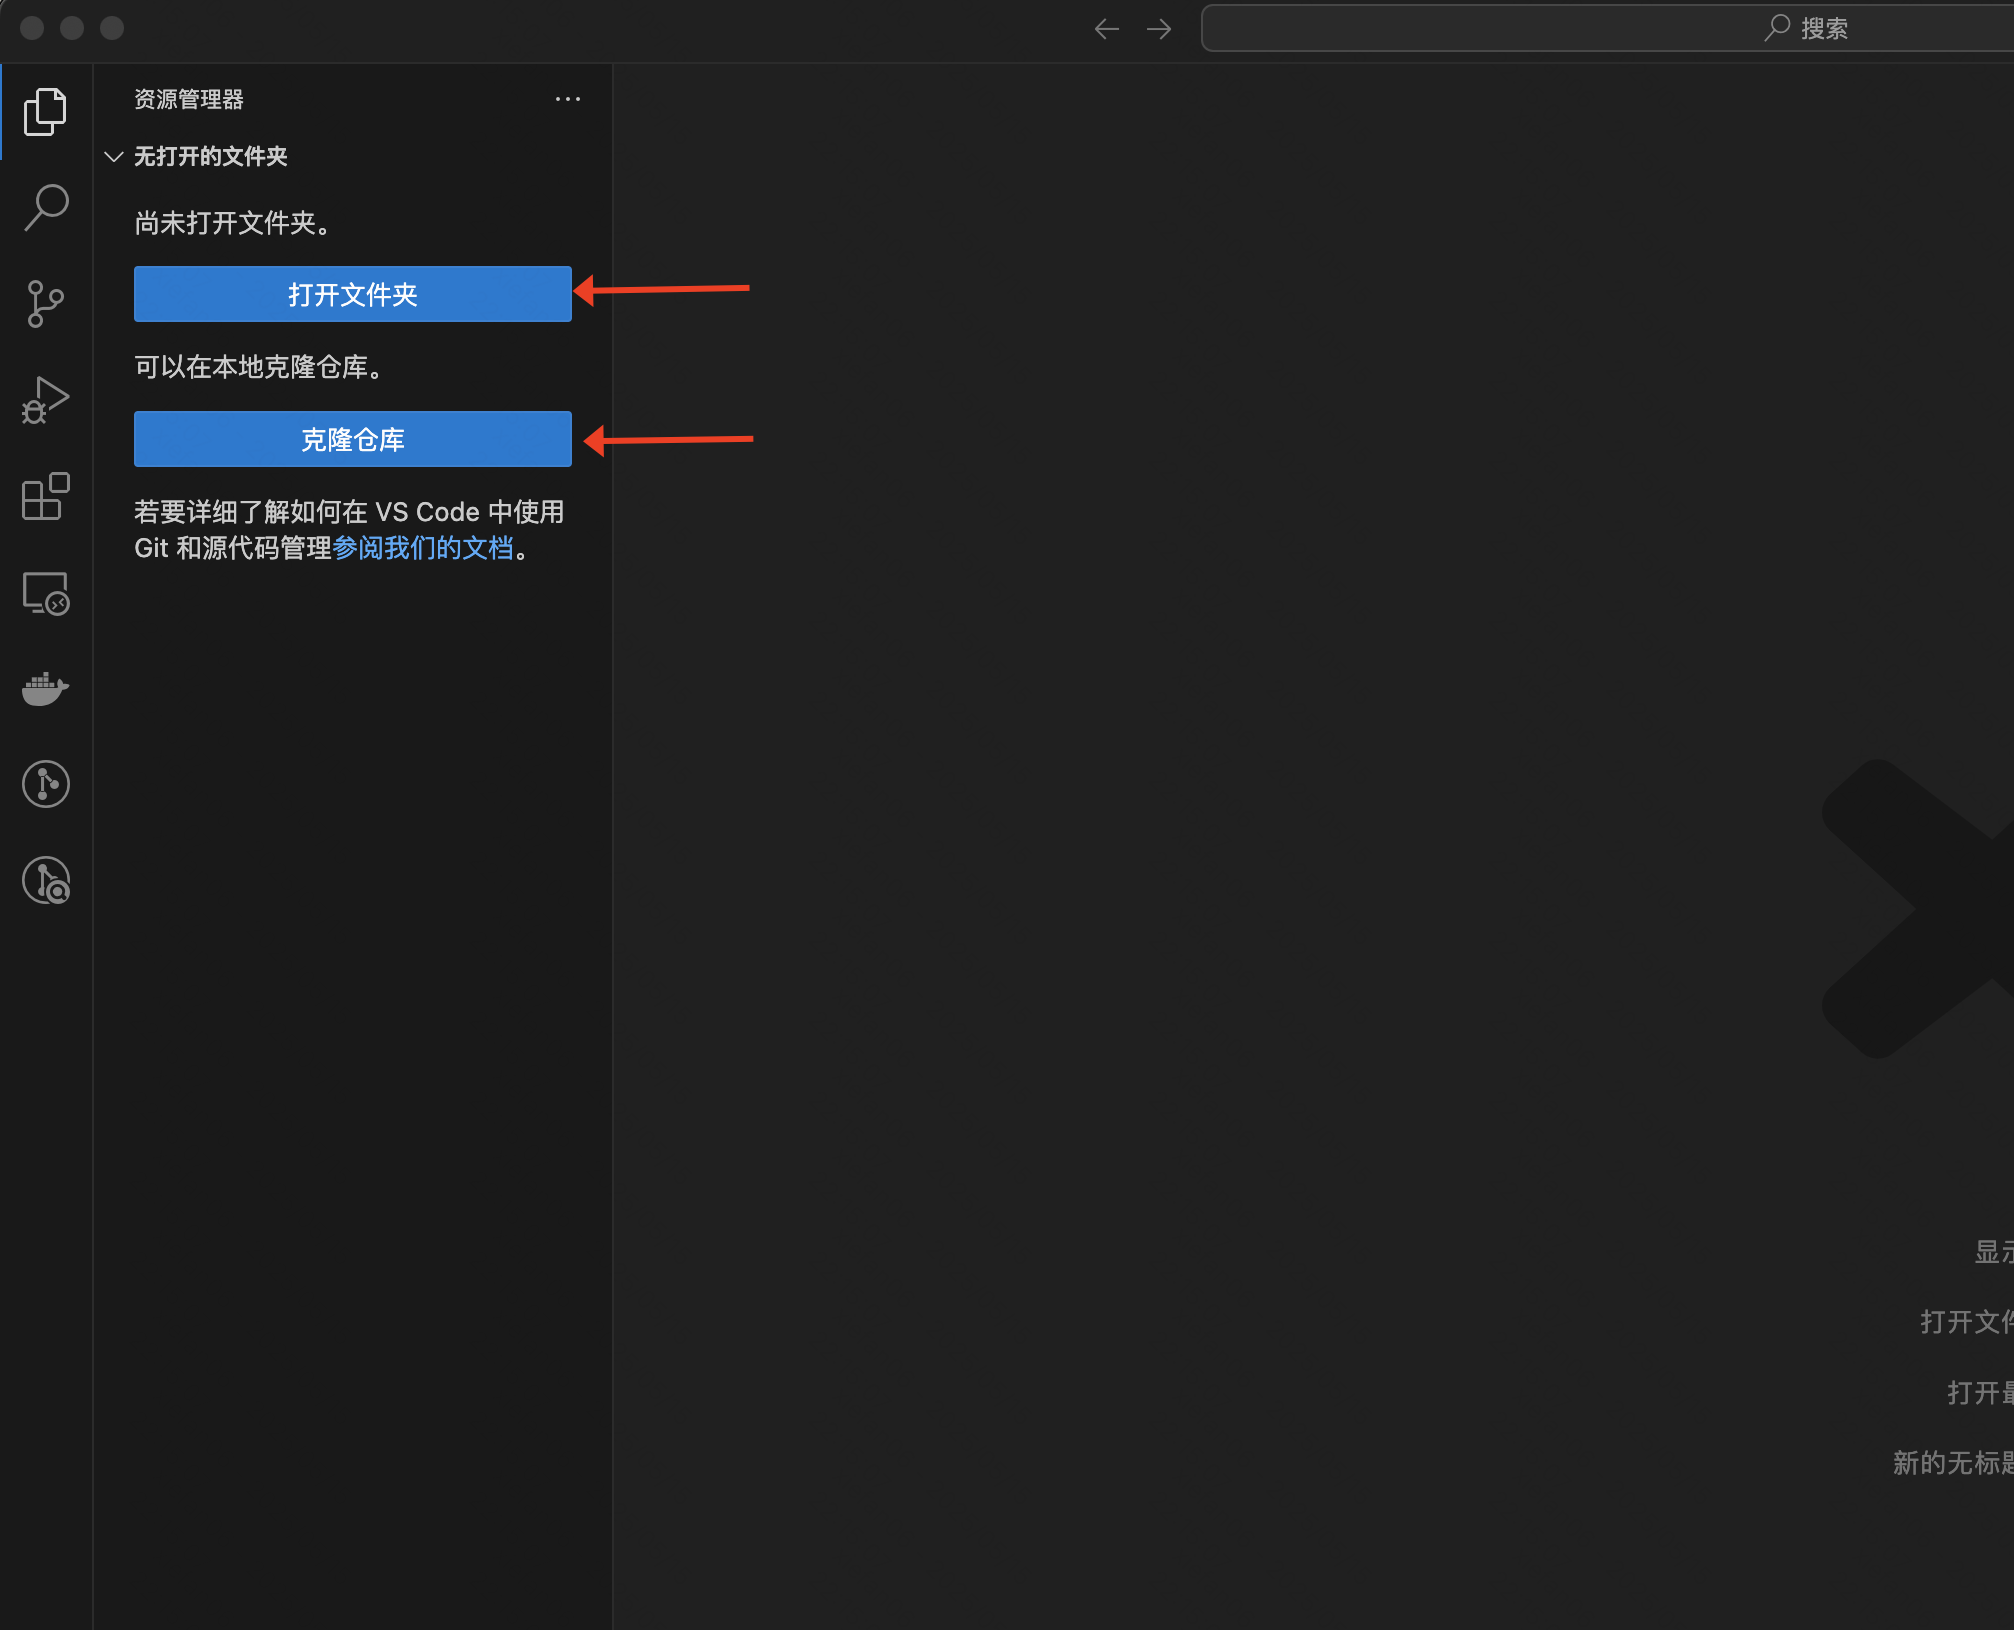
How to Add Projects for Use?
You can directly add folders/clone repositories in the left directory, or use Create New File/Open File/Folder under the File menu to use normally.


If Workspace is Important
You can vote in the following actions, we will collect feedback and accelerate support.
Feedback
We look forward to your feedback! If you have any suggestions or issues about using our products/services, you can communicate with us through the following channels.
Method 1: Built-in Feedback Button
There's a feedback button in the top right corner of CodeFlicker, clicking it will open a feedback popup.
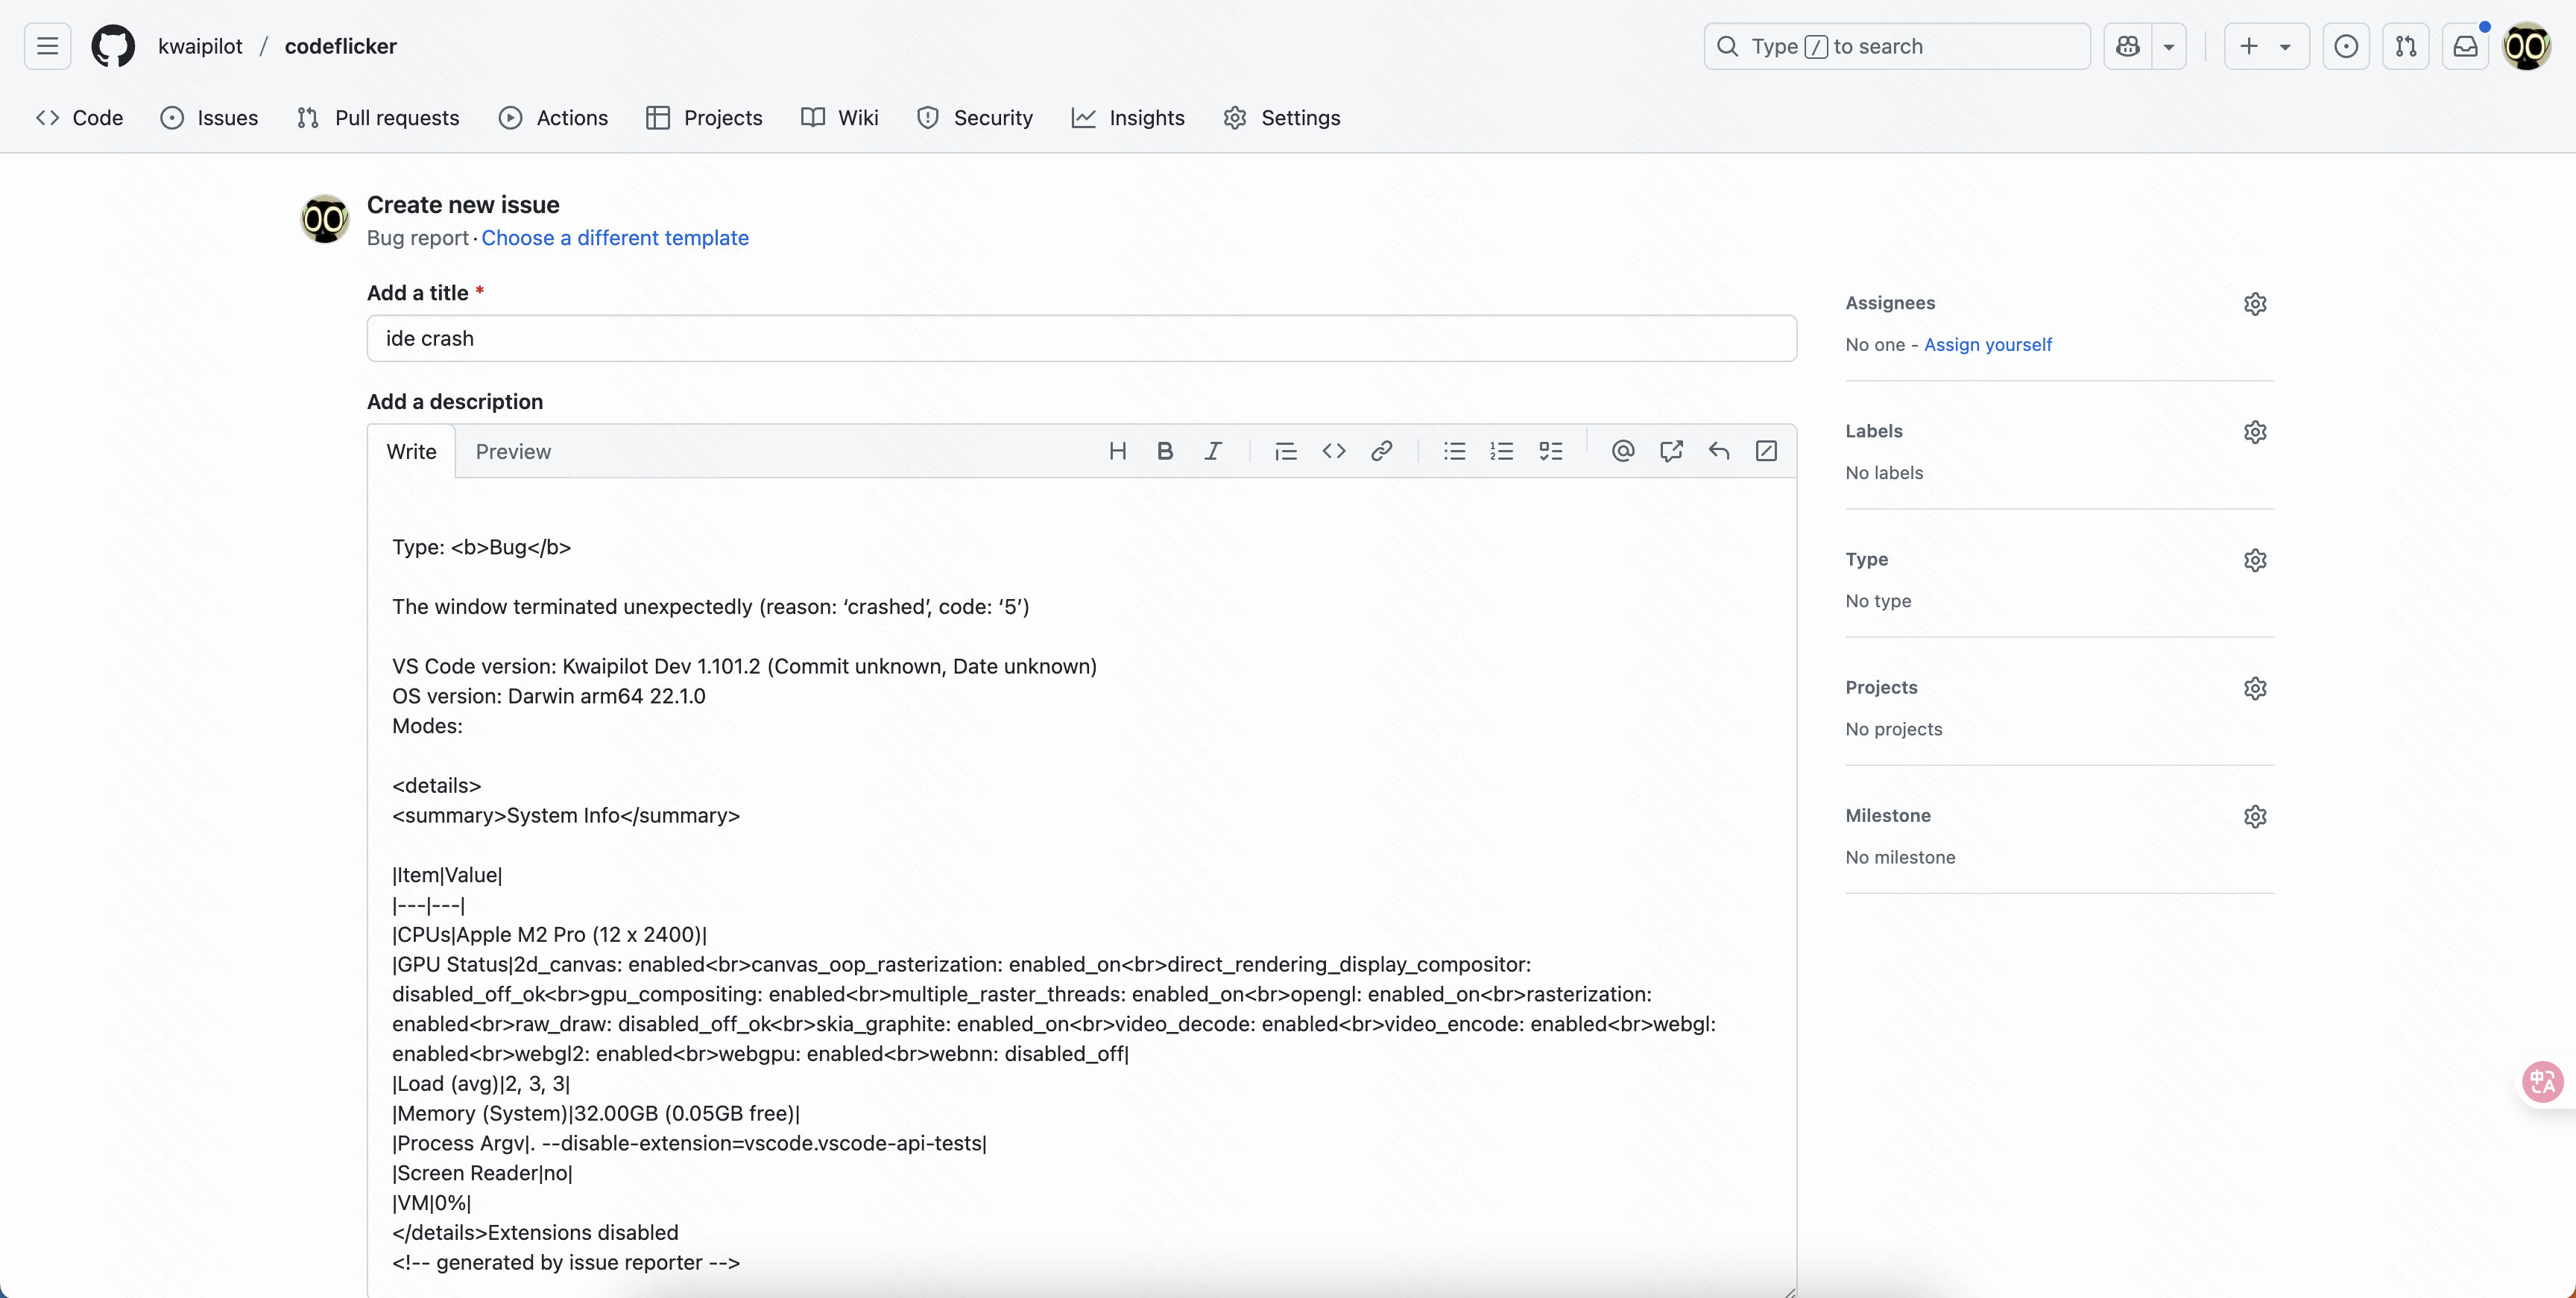
Method 2: GitHub Issues
You can also directly visit our GitHub and create a new issue to provide feedback.
Troubleshooting
Below are common issues and solutions during IDE usage.
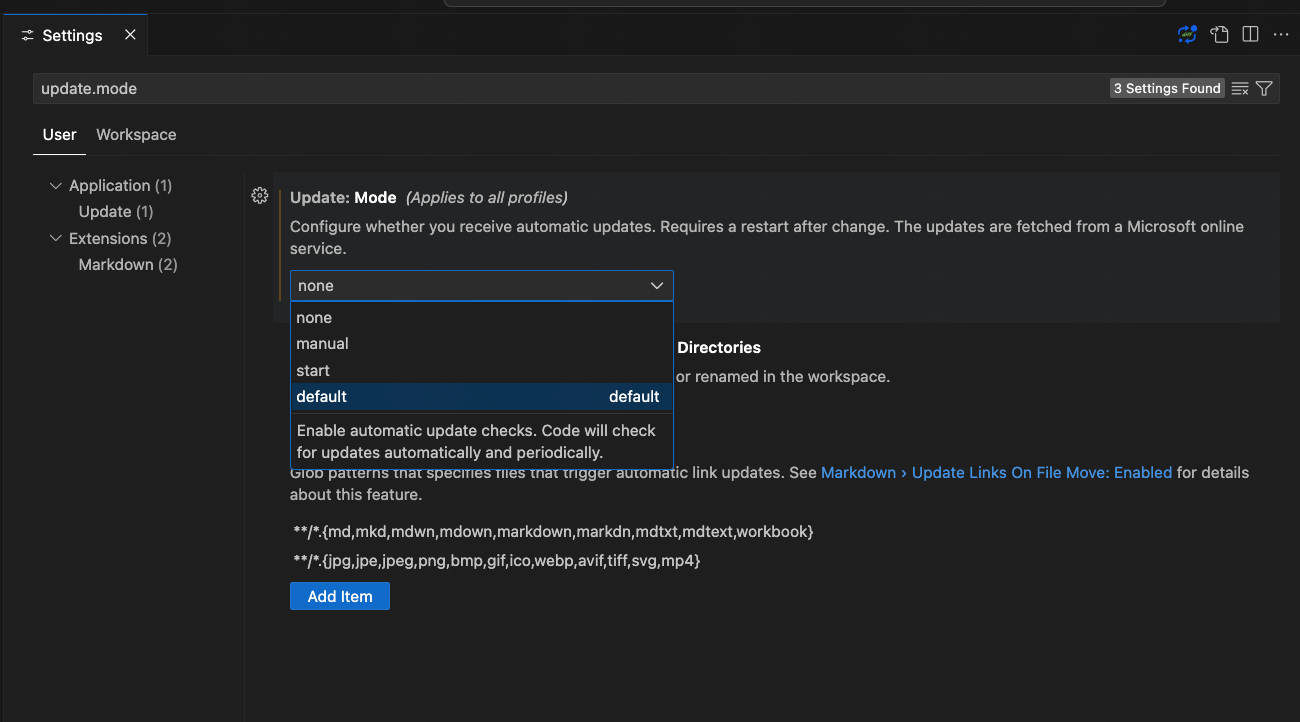
No Update Menu Item
Auto-update is typically disabled when importing settings. Manually switch to default to resolve.
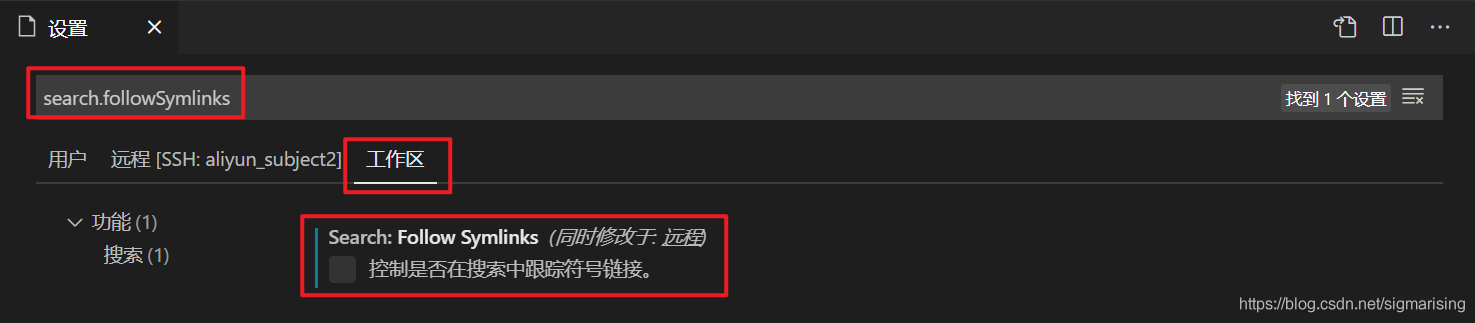
rg Process High CPU Usage
This occurs when the connected workspace contains many symbolic links.
Solution: Open settings, search search.followSymlinks, set both Remote and Workspace values to False.

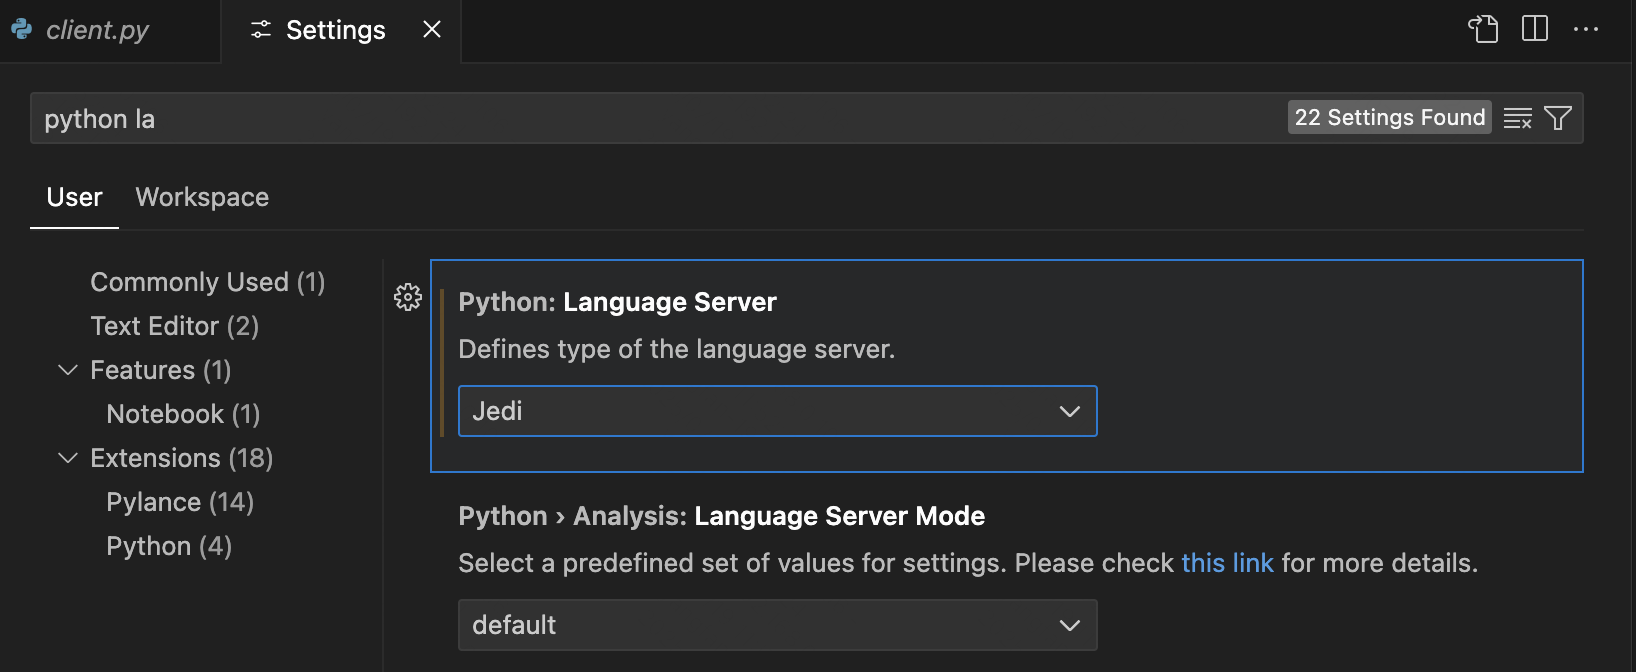
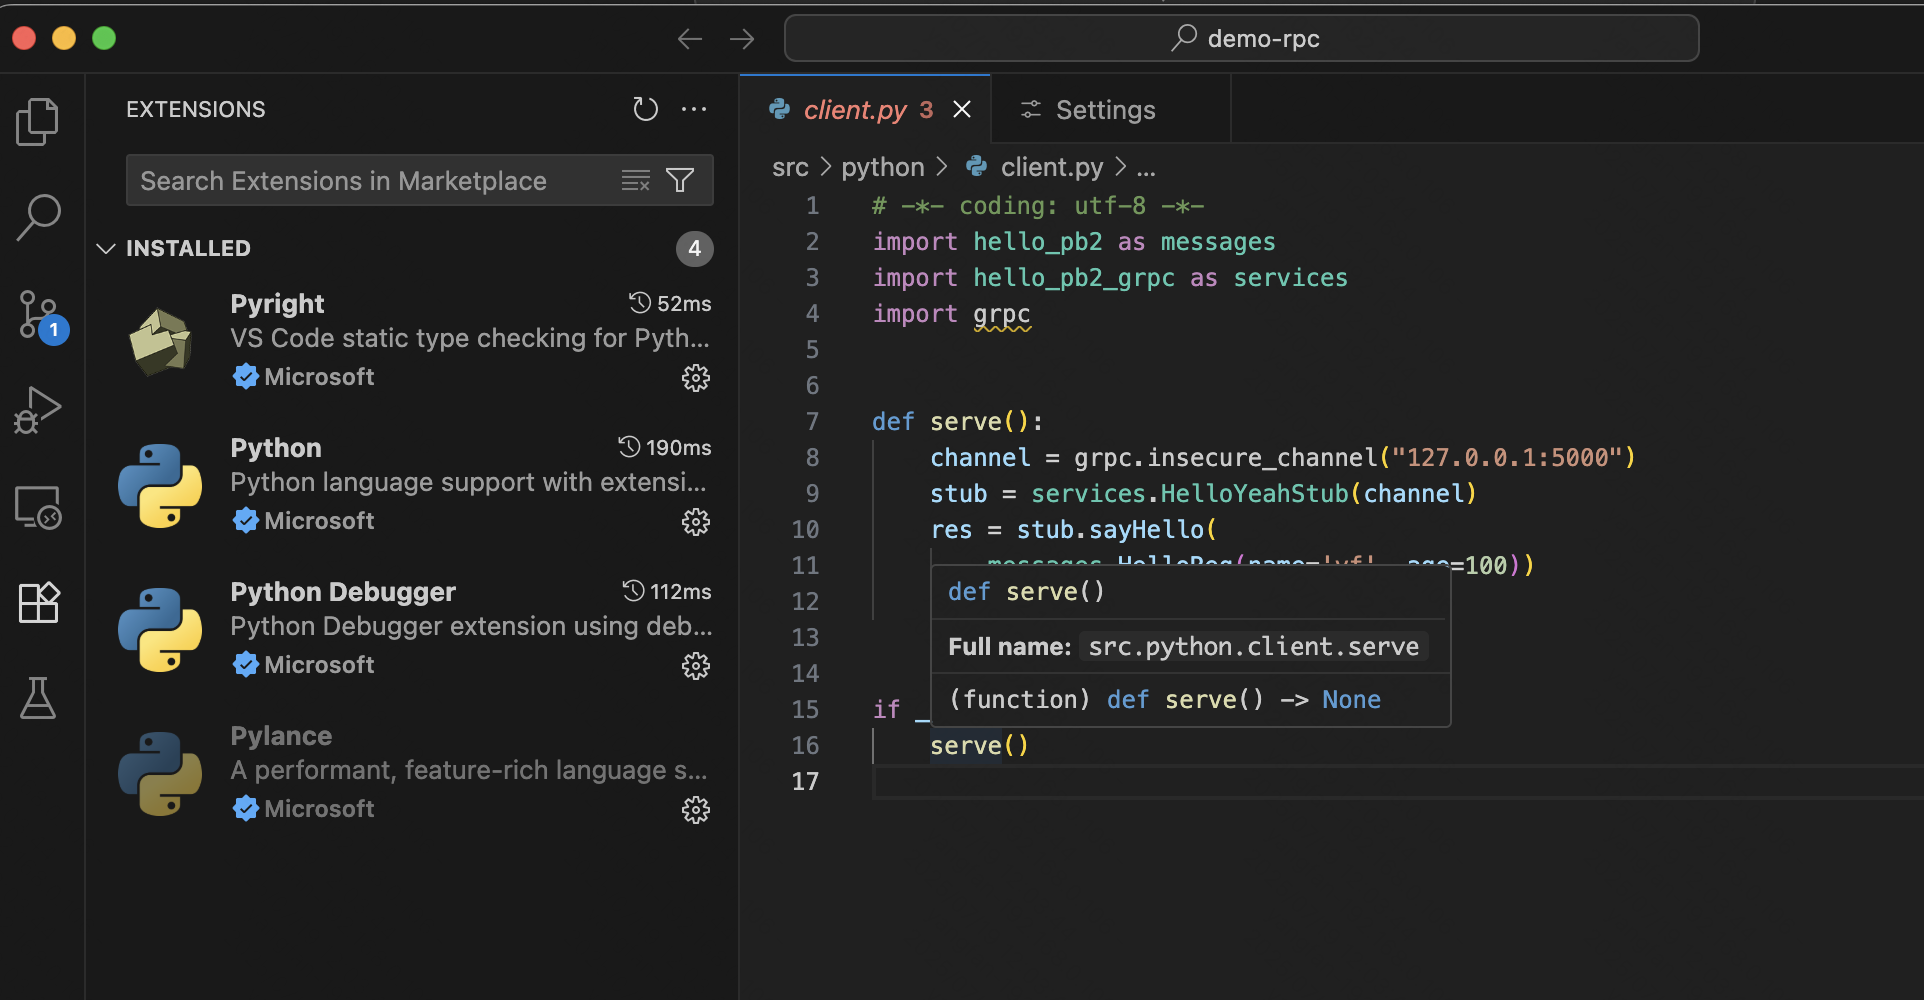
Python Language Service Not Working
CodeFlicker IDE has built-in basedpyright plugin. If the issue persists, try the following solutions:
Method 1: Switch to Jedi Service
Method 2: Use OpenVSX
Method 3: Install pyright
Chinese-English Input Error
Usually caused by third-party plugin conflicts with input method.
Troubleshooting:
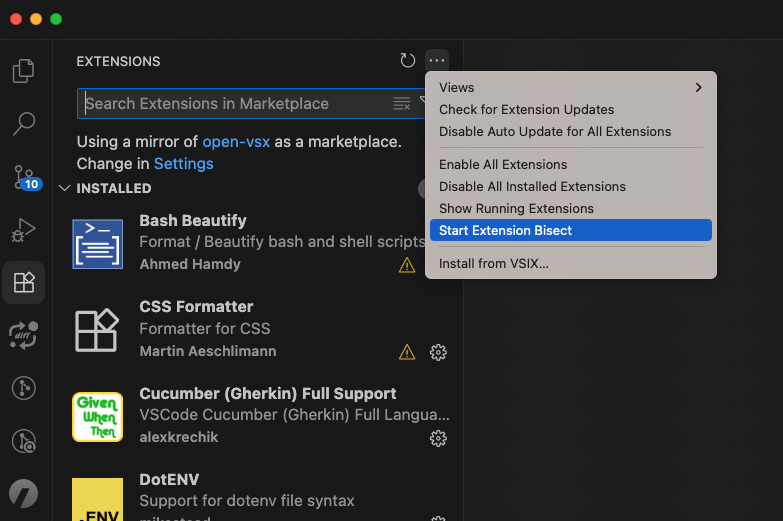
- 1. Disable all plugins to confirm if caused by third-party plugin
- 2. Use extension bisection to identify specific plugin
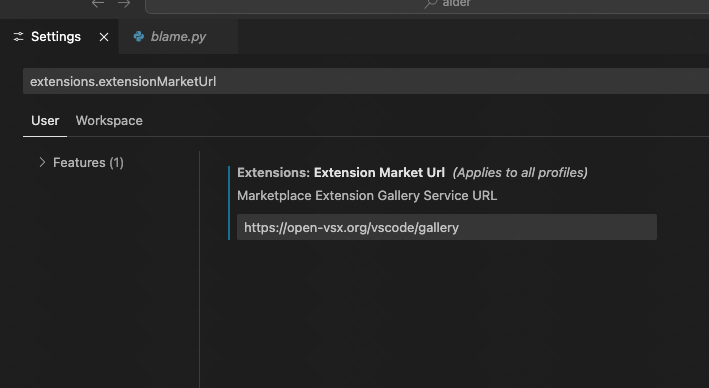
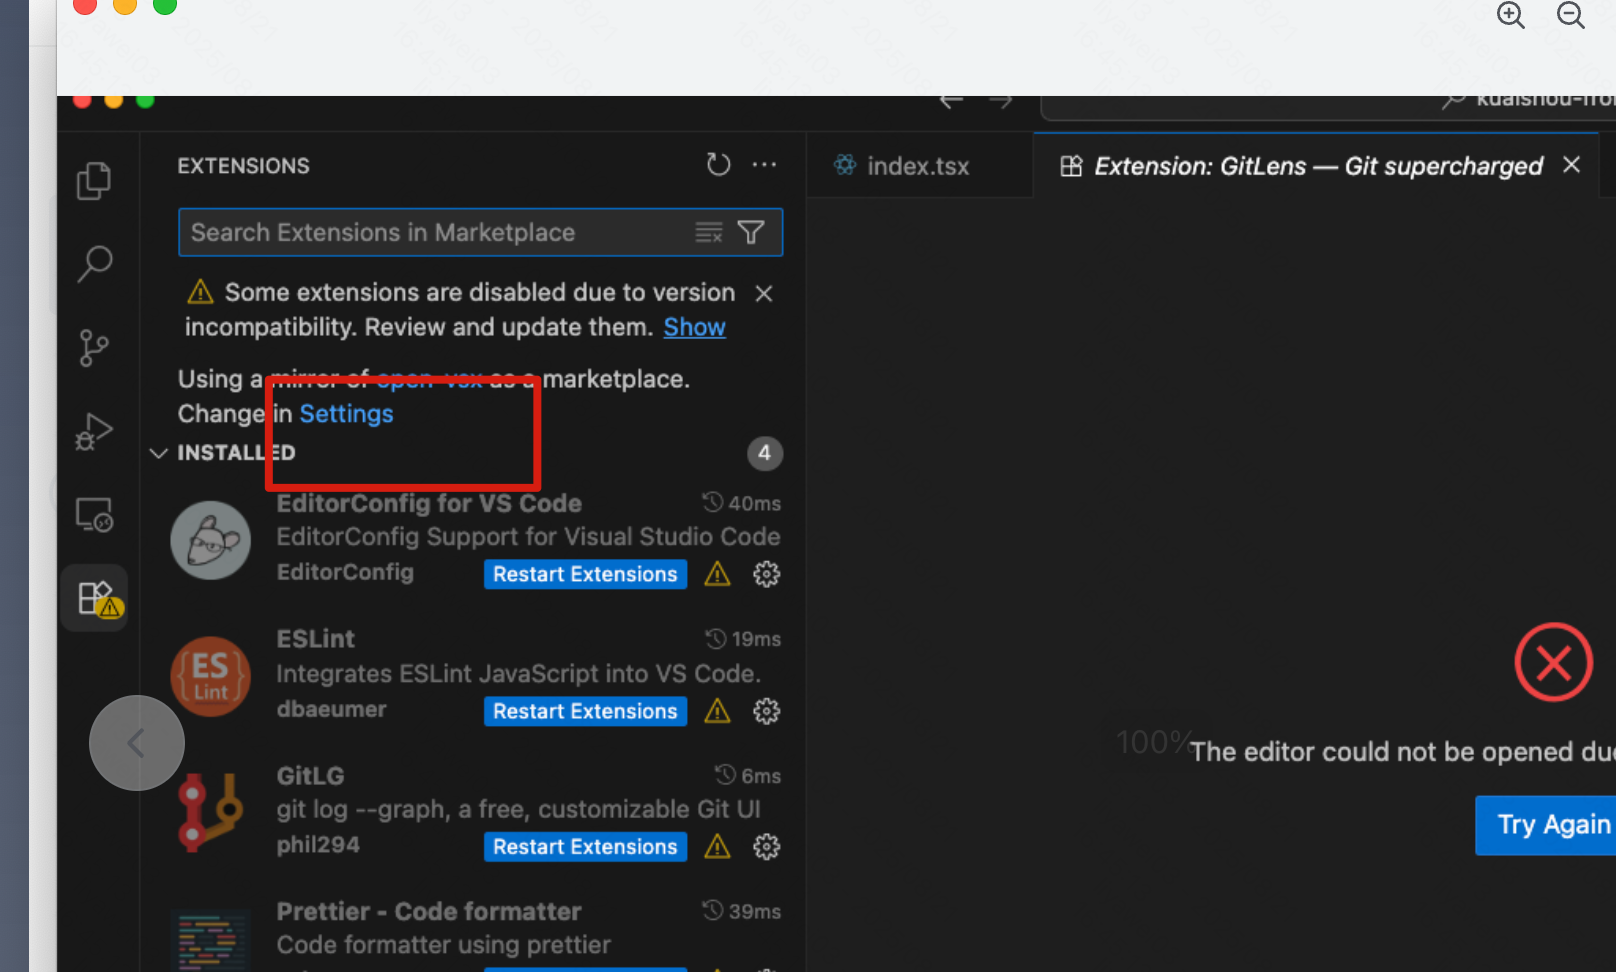
Extension Compatibility Warning
Change source to official Microsoft gallery in settings:
https://marketplace.visualstudio.com/_apis/public/gallery
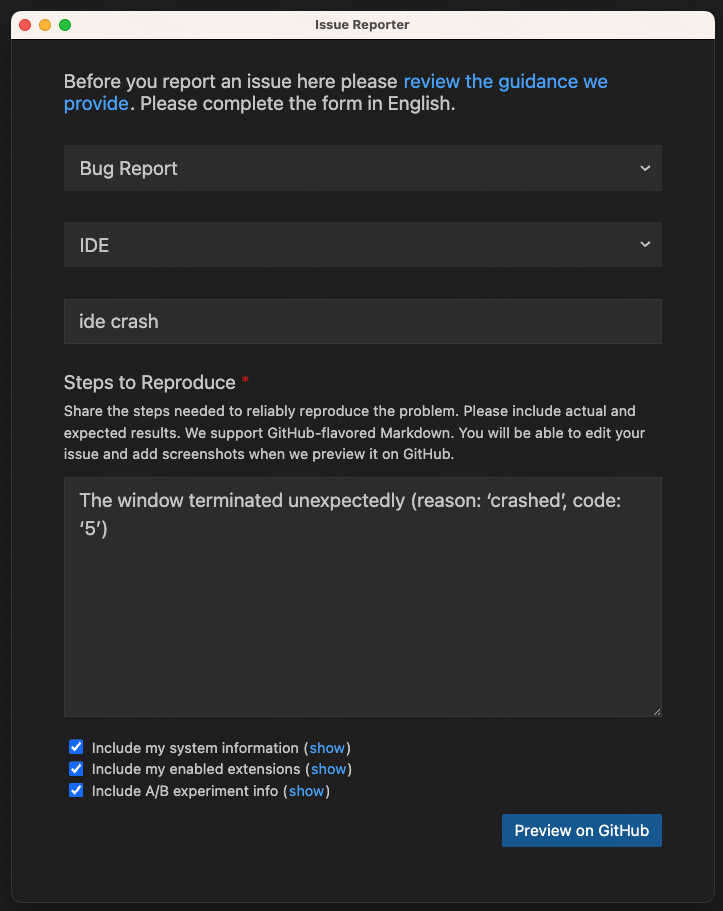
Window Crash (Error Code 5)
IDE provides --crash-reporter-directory <absolute_path> option to output crash dumps.
codeflicker --crash-reporter-directory <absolute_path>